问题描述
一般我们设置透明状态栏的时候都是通过下面代码进行设置
if(Build.VERSION.SDK_INT >= Build.VERSION_CODES.KITKAT) {
    getWindow().addFlags(WindowManager.LayoutParams.FLAG_TRANSLUCENT_STATUS);
}
然后在使用Toolbar的时候设置fitsSystemWindows="true"就可以成功设置透明状态栏了,这里还通过设置android:minHeight和maxButtonHeight将默认的Toolbar的高度56dp改为48dp。
    <style name="toolbarStyle" parent="Base.Widget.AppCompat.Toolbar" >
        <item name="android:background">@color/colorPrimary</item>

        <item name="android:layout_height">wrap_content</item>
        <item name="android:layout_width">match_parent</item>
        <item name="android:fitsSystemWindows">true</item>
        <item name="theme">@style/ToolbarTheme</item>
        <item name="popupTheme">@style/ToolbarPopupTheme</item>
        <item name="titleTextAppearance">@style/ToolbarTitle</item>
        <item name="android:minHeight">48dp</item>
        <item name="maxButtonHeight">48dp</item>
    </style>
然而这种设置方法在有EditText的布局中就会出现问题,假如有以下带有EditText的布局文件
<?xml version="1.0" encoding="utf-8"?>
<RelativeLayout
        xmlns:android="http://schemas.android.com/apk/res/android"
        android:id="@+id/activity_main"
        android:layout_width="match_parent"
        android:layout_height="match_parent">

    <android.support.v7.widget.Toolbar
            android:id="@+id/toolbar"
            style="@style/toolbarStyle">

    </android.support.v7.widget.Toolbar>

    <EditText
            android:id="@+id/edittext"
            android:layout_width="match_parent"
            android:layout_height="60dp"
            android:layout_alignParentBottom="true"
            android:background="#cccccc"
            android:hint="我是EditText"
            android:textColor="@android:color/black"/>
    <TextView
            android:layout_width="match_parent"
            android:layout_height="wrap_content"
            android:textSize="16sp"
            android:layout_below="@id/toolbar"
            android:layout_above="@id/edittext"
            android:text=""/>

</RelativeLayout>
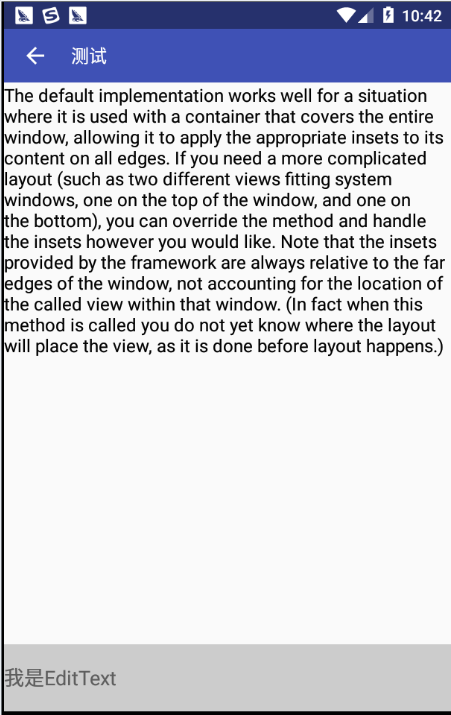
没有弹出键盘的情况下,这个布局的效果如下图所示。
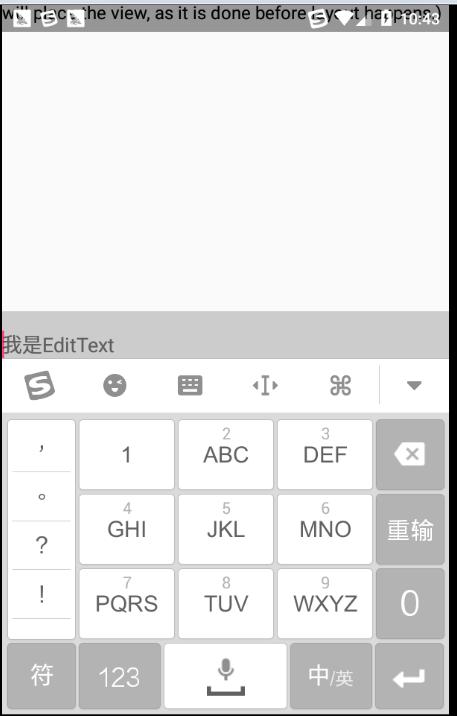
当Activity设置android:windowSoftInputMode="adjustPan"时,则会出现Toolbar被移出屏幕的情况。
当Activity设置android:windowSoftInputMode="adjustResize"时,则会出现EditText被键盘覆盖、Toolbar被拉伸的情况
问题分析
fitsSystemWindow属性
根据官方对fitsSystemWindows属性(链接)的描述,当View的fitsSystemWindows设置为true的时候,系统会自动为该View设置相应的padding以适应键盘、状态栏、导航栏等系统窗口,这就可以解释为什么给Toolbar设置fitsSystemWindows之后Toolbar会自动加上paddingTop以适应状态栏,如果没有加上fitsSystemWindows=true,Toolbar则会有部分被状态栏覆盖。
Called by the view hierarchy when the content insets for a window have changed, to allow it to adjust its content to fit within those windows. The content insets tell you the space that the status bar, input method, and other system windows infringe on the application's window.

You do not normally need to deal with this function, since the default window decoration given to applications takes care of applying it to the content of the window. If you use SYSTEM_UI_FLAG_LAYOUT_FULLSCREEN or SYSTEM_UI_FLAG_LAYOUT_HIDE_NAVIGATION this will not be the case, and your content can be placed under those system elements. You can then use this method within your view hierarchy if you have parts of your UI which you would like to ensure are not being covered.
关于fitsSystemWindows的源码实现可以看这篇文章(链接)
EditText问题分析
当设置android:windowSoftInputMode="adjustPan"时,根据官方对adjustPan(链接)的描述,设置这个属性之后 Activity 主窗口的尺寸不会调整,而是会自动平移窗口的内容使EditText永远不会被键盘覆盖,这就是为什么Toolbar会被移出屏幕的原因。
“adjustPan”
不调整 Activity 主窗口的尺寸来为软键盘腾出空间, 而是自动平移窗口的内容,使当前焦点永远不被键盘遮盖,让用户始终都能看到其输入的内容。 这通常不如尺寸调正可取,因为用户可能需要关闭软键盘以到达被遮盖的窗口部分或与这些部分进行交互。
当设置设置android:windowSoftInputMode="adjustResize"时,根据官方的解释,此时Activity窗口的尺寸会调整而为屏幕上的软键盘腾出空间,由于Toolbar设置了fitsSystemWindows为true且Toolbar的高度设置为wrap_content,因此Toolbar会被设置了一定的paddingBottom造成被拉伸。
“adjustResize”
始终调整 Activity 主窗口的尺寸来为屏幕上的软键盘腾出空间。
问题解决
首先不能在Toolbar设置fitsSystemWindows="true"让系统自动给Toolbar设置paddingTop,我们可以自己手动给Toolbar添加状态栏高度的paddingTop,具体代码如下。
public class MainActivity extends AppCompatActivity {

    @Override
    protected void onCreate(Bundle savedInstanceState) {
        super.onCreate(savedInstanceState);
        setContentView(R.layout.activity_main);

        Toolbar toolbar = (Toolbar) findViewById(R.id.toolbar);
        toolbar.setNavigationIcon(R.drawable.ic_arrow_back_white_24dp);
        toolbar.setNavigationOnClickListener(new View.OnClickListener() {
            @Override
            public void onClick(View v) {
                finish();
            }
        });
        toolbar.setTitle("测试");
        //设置透明状态栏
        if(Build.VERSION.SDK_INT >= Build.VERSION_CODES.KITKAT) {
            getWindow().addFlags(WindowManager.LayoutParams.FLAG_TRANSLUCENT_STATUS);
            toolbar.setPadding(0, getStatusBarHeight(this), 0, 0);    //给Toolbar设置paddingTop
        }
    }

    //通过反射获取状态栏高度,默认25dp
    private static int getStatusBarHeight(Context context) {
        int statusBarHeight = dip2px(context, 25);
        try {
            Class<?> clazz = Class.forName("com.android.internal.R$dimen");
            Object object = clazz.newInstance();
            int height = Integer.parseInt(clazz.getField("status_bar_height")
                    .get(object).toString());
            statusBarHeight = context.getResources().getDimensionPixelSize(height);
        } catch (Exception e) {
            e.printStackTrace();
        }
        return statusBarHeight;
    }

    //根据手机的分辨率从 dp 的单位 转成为 px(像素)
    public static int dip2px(Context context, float dpValue) {
        final float scale = context.getResources().getDisplayMetrics().density;
        return (int) (dpValue * scale + 0.5f);
    }

}
首先是android:windowSoftInputMode="adjustPan",其实我们不应该这一个布局文件设置为adjustPan,如果确实需要解决这个问题,那么应该给Toolbar下面的所有View用ScrollView给包括进去,这样自动平移只会移动ScrollView里面的内容。
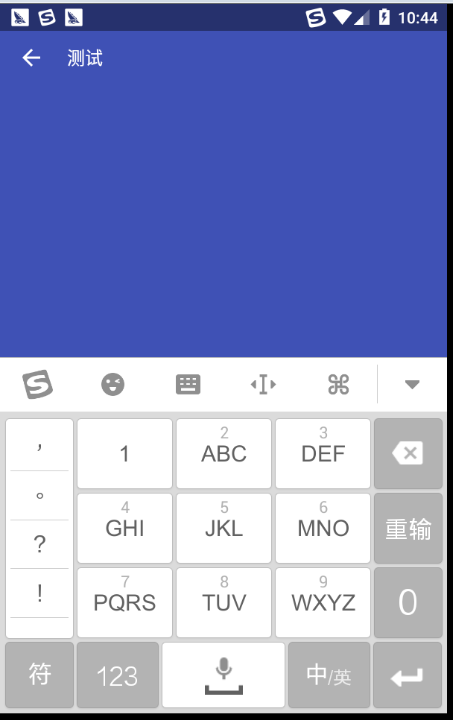
对于android:windowSoftInputMode="adjustResize",由于现在我们没有对Toolbar设置fitsSystemWindows="true",Toolbar没有被拉伸,但是EditText却被键盘覆盖住,解决这个问题最好的方法就是给最外层的View设置fitsSystemWindows="true",此时虽然EditText在键盘上面没有被覆盖住,但是最外层的View由于设置了fitsSystemWindows="true"从而导致系统会给最外层的View设置paddingTop,导致的效果如下。
解决这个问题的方法就是让最外层的View不去添加系统给的padding,通过重写View的两个方法就可以实现,这两个方法中fitSystemWindows在5.0以后就不支持了,因此5.0以后需要重写onApplyWindowInsets来进行适配,代码如下。
    @Override
    protected boolean fitSystemWindows(Rect insets) {
        if(Build.VERSION.SDK_INT >= Build.VERSION_CODES.KITKAT) {
            insets.left = 0;
            insets.top = 0;
            insets.right = 0;
        }
        return super.fitSystemWindows(insets);
    }

    @Override
    public WindowInsets onApplyWindowInsets(WindowInsets insets) {
        if(Build.VERSION.SDK_INT >= Build.VERSION_CODES.KITKAT) {
            return super.onApplyWindowInsets(insets.replaceSystemWindowInsets(0, 0, 0, insets.getSystemWindowInsetBottom()));
        } else {
            return insets;
        }
    }
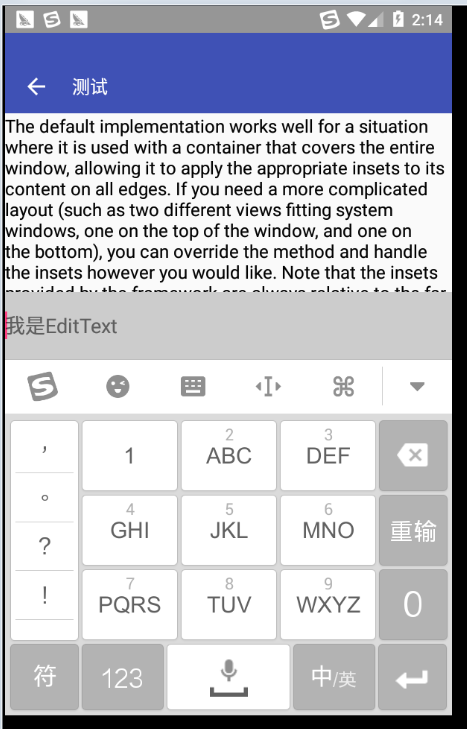
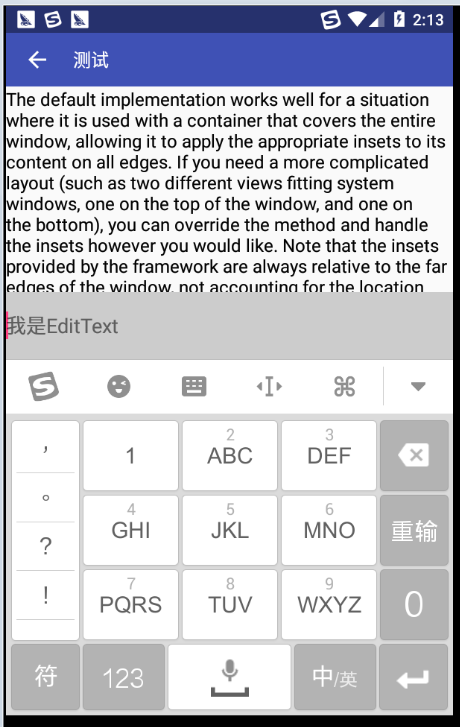
最终的效果图如下,顺利达到我们想要的效果。
代码
activity_main.xml
<?xml version="1.0" encoding="utf-8"?>
<com.sparrow.toolbar.SoftInputRelativeLayout
        xmlns:android="http://schemas.android.com/apk/res/android"
        android:id="@+id/activity_main"
        android:fitsSystemWindows="true"
        android:layout_width="match_parent"
        android:layout_height="match_parent">

    <android.support.v7.widget.Toolbar
            android:id="@+id/toolbar"
            style="@style/toolbarStyle">

    </android.support.v7.widget.Toolbar>

    <EditText
            android:id="@+id/edittext"
            android:layout_width="match_parent"
            android:layout_height="60dp"
            android:layout_alignParentBottom="true"
            android:background="#cccccc"
            android:hint="我是EditText"
            android:textColor="@android:color/black"/>
    <TextView
            android:layout_width="match_parent"
            android:layout_height="match_parent"
            android:textSize="16sp"
            android:layout_below="@id/toolbar"
            android:layout_above="@id/edittext"
            android:text="The default implementation works well for a situation where it is used with a container that covers the entire window, allowing it to apply the appropriate insets to its content on all edges. If you need a more complicated layout (such as two different views fitting system windows, one on the top of the window, and one on the bottom), you can override the method and handle the insets however you would like. Note that the insets provided by the framework are always relative to the far edges of the window, not accounting for the location of the called view within that window. (In fact when this method is called you do not yet know where the layout will place the view, as it is done before layout happens.)The default implementation works well for a situation where it is used with a container that covers the entire window, allowing it to apply the appropriate insets to its content on all edges. If you need a more complicated layout (such as two different views fitting system windows, one on the top of the window, and one on the bottom), you can override the method and handle the insets however you would like. Note that the insets provided by the framework are always relative to the far edges of the window, not accounting for the location of the called view within that window. (In fact when this method is called you do not yet know where the layout will place the view, as it is done before layout happens.)"
            android:textColor="@android:color/black"/>

</com.sparrow.toolbar.SoftInputRelativeLayout>
SoftInputRelativeLayout.java
public class SoftInputRelativeLayout  extends RelativeLayout{
    public SoftInputRelativeLayout(Context context) {
        super(context);
    }

    public SoftInputRelativeLayout(Context context, AttributeSet attrs) {
        super(context, attrs);
    }

    public SoftInputRelativeLayout(Context context, AttributeSet attrs, int defStyleAttr, int defStyleRes) {
        super(context, attrs, defStyleAttr, defStyleRes);
    }

    public SoftInputRelativeLayout(Context context, AttributeSet attrs, int defStyleAttr) {
        super(context, attrs, defStyleAttr);
    }

    @Override
    protected boolean fitSystemWindows(Rect insets) {
        if(Build.VERSION.SDK_INT >= Build.VERSION_CODES.KITKAT) {
            insets.left = 0;
            insets.top = 0;
            insets.right = 0;
        }
        return super.fitSystemWindows(insets);
    }

    @Override
    public WindowInsets onApplyWindowInsets(WindowInsets insets) {
        if(Build.VERSION.SDK_INT >= Build.VERSION_CODES.KITKAT) {
            return super.onApplyWindowInsets(insets.replaceSystemWindowInsets(0, 0, 0, insets.getSystemWindowInsetBottom()));
        } else {
            return insets;
        }
    }
}
MainActivity.java
public class MainActivity extends AppCompatActivity {

    @Override
    protected void onCreate(Bundle savedInstanceState) {
        super.onCreate(savedInstanceState);
        setContentView(R.layout.activity_main);

        Toolbar toolbar = (Toolbar) findViewById(R.id.toolbar);
        toolbar.setNavigationIcon(R.drawable.ic_arrow_back_white_24dp);
        toolbar.setNavigationOnClickListener(new View.OnClickListener() {
            @Override
            public void onClick(View v) {
                finish();
            }
        });
        toolbar.setTitle("测试");
        //设置透明状态栏
        if(Build.VERSION.SDK_INT >= Build.VERSION_CODES.KITKAT) {
            getWindow().addFlags(WindowManager.LayoutParams.FLAG_TRANSLUCENT_STATUS);
            toolbar.setPadding(0, getStatusBarHeight(this), 0, 0);
        }
    }

    //获取状态栏高度
    private static int getStatusBarHeight(Context context) {
        int statusBarHeight = dip2px(context, 25);
        try {
            Class<?> clazz = Class.forName("com.android.internal.R$dimen");
            Object object = clazz.newInstance();
            int height = Integer.parseInt(clazz.getField("status_bar_height")
                    .get(object).toString());
            statusBarHeight = context.getResources().getDimensionPixelSize(height);
        } catch (Exception e) {
            e.printStackTrace();
        }
        return statusBarHeight;
    }

    //根据手机的分辨率从 dp 的单位 转成为 px(像素)
    public static int dip2px(Context context, float dpValue) {
        final float scale = context.getResources().getDisplayMetrics().density;
        return (int) (dpValue * scale + 0.5f);
    }

}
styles.xml
<resources>

    <!-- Base application theme. -->
    <style name="AppTheme" parent="Theme.AppCompat.Light.NoActionBar">
        <!-- Customize your theme here. -->
        <item name="colorPrimary">@color/colorPrimary</item>          <!-- 标题栏颜色 -->
        <item name="colorPrimaryDark">@color/colorAccent</item>   <!-- 状态栏颜色 -->
        <item name="colorAccent">@color/colorAccent</item>              <!-- 控件颜色 -->
        <item name="android:textColorSecondary">#ffffff</item>          <!-- 返回按钮和三点更多按钮颜色 -->
        <item name="android:textColorPrimary">@android:color/white</item>       <!--标题文字颜色-->
    </style>

    <!-- toolbar标题样式 -->
    <style name="ToolbarTitle" parent="@style/TextAppearance.Widget.AppCompat.Toolbar.Title">
        <item name="android:textSize">16sp</item>
    </style>

    <style name="myPopupMenu" parent="@style/TextAppearance.AppCompat.Widget.PopupMenu.Small"></style>

    <style name="MyPopupMenu" parent="Base.Widget.AppCompat.PopupMenu">

    </style>

    <!-- toolbar菜单文字颜色 -->
    <style name="ToolbarTheme" parent="@style/ThemeOverlay.AppCompat.ActionBar">
        <item name="actionMenuTextColor">@android:color/white</item>       <!-- 菜单文字颜色 -->
        <item name="actionMenuTextAppearance">@style/ToolbarMenuTextSize</item>
    </style>

    <!-- toolbar菜单文字尺寸 -->
    <style name="ToolbarMenuTextSize" parent="@style/TextAppearance.AppCompat.Menu">
        <item name="android:textSize">10sp</item>
    </style>

    <!-- toolbar弹出菜单样式 -->
    <style name="ToolbarPopupTheme" parent="@style/ThemeOverlay.AppCompat">
        <item name="android:colorBackground">#212121</item>             <!-- 弹窗菜单背景颜色 -->
        <item name="actionOverflowMenuStyle">@style/OverflowMenuStyle</item>
    </style>

    <style name="OverflowMenuStyle" parent="Widget.AppCompat.Light.PopupMenu.Overflow">
        <item name="overlapAnchor">false</item>  <!--把该属性改为false即可使menu位置位于toolbar之下-->
    </style>

    <style name="toolbarStyle" parent="Base.Widget.AppCompat.Toolbar" >
        <item name="android:background">@color/colorPrimary</item>

        <item name="android:layout_height">wrap_content</item>
        <item name="android:layout_width">match_parent</item>
        <!--<item name="android:fitsSystemWindows">true</item>-->
        <item name="theme">@style/ToolbarTheme</item>
        <item name="popupTheme">@style/ToolbarPopupTheme</item>
        <item name="titleTextAppearance">@style/ToolbarTitle</item>
        <item name="android:minHeight">48dp</item>
        <item name="maxButtonHeight">48dp</item>
    </style>

</resources>
新的问题
在使用的过程中发现有用户反馈,说只要进入我们采用该布局的页面就会崩溃,我们查看了崩溃日志,发现有部分手机都使用了相同的一个安卓系统,并且版本都是19,android4.4.x,YunOS系统,异常信息为 java.lang.ClassNotFoundException: Didn't find class "android.view.WindowInsets" 。
这应该是该系统的虚拟机加载类的方法不一样,在加载一个类的时候也将函数涉及到的其他类也一起进行加载了,因为WindowInsets是Api为20才添加的,所有才会出现ClassNotFoundException这一个异常,解决方法网上有人给出方法,就是增加layout_v20文件夹,针对不同的版本写不一样的布局,分别为api 20以上与20以下提供不同的布局,这是采用系统的限定符实现的,之后20以上的原样采用上述的方式,20以下去掉onApplyWindowInsets复写,这样不同的版本加载不同的代码就OK了。
具体可以查看一下这篇博客(链接)。
