Volley 的中文翻译为“齐射、并发”,是在2013年的Google大会上发布的一款Android平台网络通信库,具有网络请求的处理、小图片的异步加载和缓存等功能,能够帮助 Android APP 更方便地执行网络操作,而且更快速高效。Volley可是说是把AsyncHttpClient和Universal-Image-Loader的优点集于了一身,既可以像AsyncHttpClient一样非常简单地进行HTTP通信,也可以像Universal-Image-Loader一样轻松加载网络上的图片。除了简单易用之外,Volley在性能方面也进行了大幅度的调整,它的设计目标就是非常适合去进行数据量不大,但通信频繁的网络操作,而对于大数据量的网络操作,比如说下载文件等,Volley的表现就会非常糟糕。
在Google IO的演讲上,其配图是一幅发射火弓箭的图,有点类似流星。这表示,Volley特别适合数据量不大但是通信频繁的场景。见下图:

目录
[Volley特点]
[Volley执行流程]
[Volley初始化]
[创建RequestQueue]
[DiskBasedCache]
[CacheDispatcher & NetworkDispatcher]
[Request]
[加入RequestQueue]
[Request#finish自己]
[取消请求]
[缓存处理]
[Request请求失败重试机制]
[PoolingByteArrayOutputStream & ByteArrayPool]
[Volley加载图片 ]
[Handler]
[volley gson改造 ]
[volley okhttp改造]
Volley特点
-
自动调度网络请求;
- Volley直接new 5个线程(默认5个),让多个线程去抢夺网络请求对象(Request),抢到就执行,抢不到就等待,直到有网络请求到来。
可以加载图片;
通过标准的 HTTP cache coherence(高速缓存一致性)缓存磁盘和内存透明的响应;
-
支持指定请求的优先级;
- 根据优先级去请求数据
-
网络请求cancel机制。我们可以取消单个请求,或者指定取消请求队列中的一个区域;
- 例如Activity finish后结束请求
-
框架容易被定制,例如,定制重试或者网络请求库;
- 例如基于Okhttp的Volley
Volley执行流程
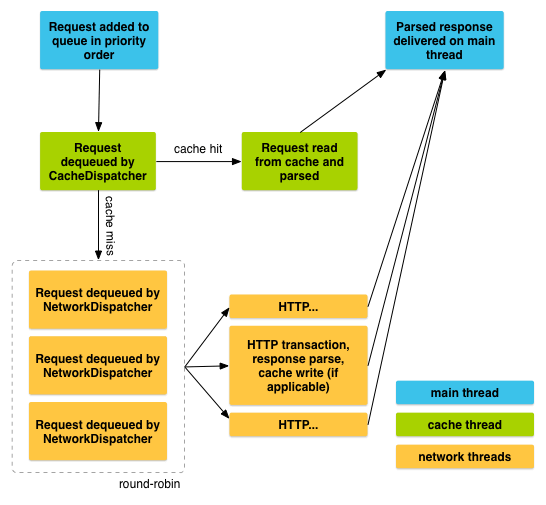
Volley初始化
创建RequestQueue
使用Volley时我们需要先创建一个RequestQueue,如下
RequestQueue queue = Volley.newRequestQueue(context);
Volley.newRequestQueue(context)最终调用了如下方法
    public static RequestQueue newRequestQueue(Context context, HttpStack stack) {
        File cacheDir = new File(context.getCacheDir(), DEFAULT_CACHE_DIR);
        ...
        if (stack == null) {
            if (Build.VERSION.SDK_INT >= 9) {
                stack = new HurlStack();
            } else {
                // Prior to Gingerbread, HttpUrlConnection was unreliable.
                // See: http://android-developers.blogspot.com/2011/09/androids-http-clients.html
                stack = new HttpClientStack(AndroidHttpClient.newInstance(userAgent));
            }
        }

        Network network = new BasicNetwork(stack);

        RequestQueue queue = new RequestQueue(new DiskBasedCache(cacheDir), network);
        queue.start();

        return queue;
    }
HttpStack 是一个接口,主要用于请求网络数据,并返回结果。默认情况下stack是null,
当android版本>=9时使用HurlStack,否则使用HttpClientStack
若用户想要使用其他的网络请求类库,比如okhttp等就可以实现HttpStack接口,并在
HttpResponse performRequest(Request<?> request, Map<String, String> additionalHeaders)
    throws IOException, AuthFailureError
中调用okhttp进行网络请求,并把请求的结果封装成一个
HttpResponse返回即可,HttpResponse中包含了状态码,响应头,body信息。
newRequestQueue中创建了一个BasicNetwork对象,BasicNetwork使用HttpStack执行网络请求,成功后返回一个NetworkResponse,NetworkResponse只是一个简单的记录状态码,body,响应头,服务端是否返回304并且缓存过,执行网络请求时间的类。
DiskBasedCache
newRequestQueue 中还创建了一个 RequestQueue,RequestQueue 中持有一个 DiskBasedCache 对象,
DiskBasedCache 是把服务端返回的数据保持到本地文件中的类,默认大小5M。
缓存文件是一个二进制文件,非文本文件,
缓存文件的开头有个特殊的整型魔数(CACHE_MAGIC),用于判断是不是缓存文件。DiskBasedCache 初始化时会
读取特定文件夹下的所有文件的部分数据,包括响应头等极少数数据,不包含body,当调用DiskBasedCache的get(String key)方法时才读取body部分,若文件开头魔数不是 CACHE_MAGIC 则删除。是的话就把读取的数据保存到内存中。代码如下
public synchronized void initialize() {
        if (!mRootDirectory.exists()) {

            return;
        }

        File[] files = mRootDirectory.listFiles();
        if (files == null) {
            return;
        }
        for (File file : files) {
            BufferedInputStream fis = null;
            try {
                fis = new BufferedInputStream(new FileInputStream(file));
                CacheHeader entry = CacheHeader.readHeader(fis);
                entry.size = file.length();
                putEntry(entry.key, entry);
            } catch (IOException e) {
                if (file != null) {
                    file.delete();
                }
            } finally {
                try {
                    if (fis != null) {
                        fis.close();
                    }
                } catch (IOException ignored) { }
            }
        }
    }
缓存文件除了可以保存 int,long 型数据,还可以保存 String 字符串,Map<String,String>,保存字符串时先保存字符串的长度( long 型),然后再保存 byte[]数组。
保存 Map<String,String>时,先保存 Map 大小( int 型),然后再保存key和value。代码如下
    static String readString(InputStream is) throws IOException {
        int n = (int) readLong(is);
        byte[] b = streamToBytes(is, n);
        return new String(b, "UTF-8");
    }
    static Map<String, String> readStringStringMap(InputStream is) throws IOException {
        int size = readInt(is);
        Map<String, String> result = (size == 0)
        ? Collections.<String, String>emptyMap()
        : new HashMap<String, String>(size);
        for (int i = 0; i < size; i++) {
            String key = readString(is).intern();
            String value = readString(is).intern();
            result.put(key, value);
        }
        return result;
    }
    static long readLong(InputStream is) throws IOException {
        long n = 0;
        n |= ((read(is) & 0xFFL) << 0);
        n |= ((read(is) & 0xFFL) << 8);
        n |= ((read(is) & 0xFFL) << 16);
        n |= ((read(is) & 0xFFL) << 24);
        n |= ((read(is) & 0xFFL) << 32);
        n |= ((read(is) & 0xFFL) << 40);
        n |= ((read(is) & 0xFFL) << 48);
        n |= ((read(is) & 0xFFL) << 56);
        return n;
    }
缓存文件名由cache key字符串的前半段字符串的hashCode拼接上cache key(网络请求url)后
半段字符串的hashCode值组成。代码如下
private String getFilenameForKey(String key) {
        int firstHalfLength = key.length() / 2;
        String localFilename = String.valueOf(key.substring(0, firstHalfLength).hashCode());
        localFilename += String.valueOf(key.substring(firstHalfLength).hashCode());
        return localFilename;
    }
当缓存文件占用空间超过指定值时,Volley只是简单的删除的部分文件,删除代码如下
private void pruneIfNeeded(int neededSpace) {
        if ((mTotalSize + neededSpace) < mMaxCacheSizeInBytes) {
            return;
        }

        Iterator<Map.Entry<String, CacheHeader>> iterator = mEntries.entrySet().iterator();
        while (iterator.hasNext()) {
            Map.Entry<String, CacheHeader> entry = iterator.next();
            CacheHeader e = entry.getValue();
            boolean deleted = getFileForKey(e.key).delete();
            if (deleted) {
                mTotalSize -= e.size;
            }
            iterator.remove();

            if ((mTotalSize + neededSpace) < mMaxCacheSizeInBytes * 0.9f) {
                break;
            }
        }
    }
可以看到删除时只是遍历mEntries,如果删除成功并且剩余文件所占大小+新的缓存所需空间<mMaxCacheSizeInBytes * 0.9f,
则停止删除,否则继续删除。
CacheDispatcher & NetworkDispatcher
RequestQueue 只是一个普通的类,没有继承任何类,RequestQueue 的 start 方法中创建了一个 CacheDispatcher,和4个(默认4个)NetworkDispatcher,
CacheDispatcher 和 NetworkDispatcher 都是 Thread 的直接子类,这5个 Thread 就是前面提到的抢夺网络请求对象的 Thread。
调用start()时先调用了一下stop(),stop()中把5个线程的mQuit设为 true,然后调用interrupt()让 Thread 的run不再执行。
代码如下
public void start() {
        stop();  // Make sure any currently running dispatchers are stopped.
        // Create the cache dispatcher and start it.
        mCacheDispatcher = new CacheDispatcher(mCacheQueue, mNetworkQueue, mCache, mDelivery);
        mCacheDispatcher.start();

        // Create network dispatchers (and corresponding threads) up to the pool size.
        for (int i = 0; i < mDispatchers.length; i++) {
            NetworkDispatcher networkDispatcher = new NetworkDispatcher(mNetworkQueue, mNetwork,
                mCache, mDelivery);
            mDispatchers[i] = networkDispatcher;
            networkDispatcher.start();
        }


        mCache.initialize();
         while (true) {
            try {
              // Get a request from the cache triage queue, blocking until
              // at least one is available.
                final Request<?> request = mCacheQueue.take();

                ...

            }
        }
    }
 /**
     * Stops the cache and network dispatchers.
     */
    public void stop() {
        if (mCacheDispatcher != null) {
            mCacheDispatcher.quit();
        }
        for (int i = 0; i < mDispatchers.length; i++) {
            if (mDispatchers[i] != null) {
                mDispatchers[i].quit();
            }
        }
    }
CacheDispatcher启动后先调用了一下DiskBasedCache的initialize()方法,这个方法要读取文件,比较耗时,Volley把他放到了Cache线程中。
CacheDispatcher和NetworkDispatcher的run方法内部很像,都是在 while (true)循环中从PriorityBlockingQueue中读取Request,CacheDispatcher 独享一个PriorityBlockingQueue,其余4各 NetworkDispatcher 共享一个PriorityBlockingQueue 。PriorityBlockingQueue是一个阻塞队列,当队列里没有Request时take()方法就会阻塞,直到有Request到来,PriorityBlockingQueue是线程安全的
同一个 Request 只能被1个线程获取到。PriorityBlockingQueue 可以根据线程优先级对队列里的reqest进行排序。
Volley 的初始化到这就完成了,下面开始执行网络请求
Request
使用 Volley 进行网络请求时我们要把请求封装成一个 Request 对象,包括url,请求参数,请求成功失败 Listener,
Volley 默认给我们提供了 ImageRequest(获取图片),
JsonObjectRequest、JsonArrayRequest(获取json),StringRequest(获取 String)。
例如:
Request<String>request=new StringRequest(Method.GET, "http://mogujie.com", new  Listener<String>(){
        @Override
        public void onResponse(String response) {
        }

    }, new Response.ErrorListener() {
        @Override
        public void onErrorResponse(VolleyError error) {
        }
    });
    Volley.newRequestQueue(context).add(request);
只需要把Request丢进requestQueue中就可以。
加入RequestQueue
我们来看一下add方法:
 public <T> Request<T> add(Request<T> request) {
        // Tag the request as belonging to this queue and add it to the set of current requests.
        request.setRequestQueue(this);
        synchronized (mCurrentRequests) {
            mCurrentRequests.add(request);
        }

        // Process requests in the order they are added.
        request.setSequence(getSequenceNumber());
        request.addMarker("add-to-queue");

        // If the request is uncacheable, skip the cache queue and go straight to the network.
        if (!request.shouldCache()) {
            mNetworkQueue.add(request);
            return request;
        }

        // Insert request into stage if there's already a request with the same cache key in flight.
        synchronized (mWaitingRequests) {
            String cacheKey = request.getCacheKey();
            if (mWaitingRequests.containsKey(cacheKey)) {
                // There is already a request in flight. Queue up.
                Queue<Request<?>> stagedRequests = mWaitingRequests.get(cacheKey);
                if (stagedRequests == null) {
                    stagedRequests = new LinkedList<Request<?>>();
                }
                stagedRequests.add(request);
                mWaitingRequests.put(cacheKey, stagedRequests);
                if (VolleyLog.DEBUG) {
                    VolleyLog.v("Request for cacheKey=%s is in flight, putting on hold.", cacheKey);
                }
            } else {
                // Insert 'null' queue for this cacheKey, indicating there is now a request in
                // flight.
                mWaitingRequests.put(cacheKey, null);
                mCacheQueue.add(request);
            }
            return request;
        }
    }
add方法中首先设置了request所在的请求队列,为了在用户取消请求时能够把request从requestQueue中移除掉。
接下来设置了一下request的序列号,序列号按添加顺序依次从0开始编号,同一个队列中任何两个request的序列号都不相同。序列号可以影响request的优先级。
request.addMarker("")用于调试(打印日志等)。
通过查看源码我们可以看到request默认是需要缓存的。
/** Whether or not responses to this request should be cached. */
    private boolean mShouldCache = true;
若request不需要缓存则直接把request丢到mNetworkQueue,然后4个 NetworkDispatcher 就可以"抢夺"request了,谁"抢"到谁就执行网络请求
如需要缓存则先判断一下mWaitingRequests中有没有正在请求的相同的request(根据request的url判断),没有的话就把该request丢到mCacheQueue中,
这样 CacheDispatcher 执行完之前的请求后就可以执行该request了,若已经有相同的request正在执行,则只需保存一下该request,
等相同的request执行完后直接使用其结果就可。
CacheDispatcher中获取到request后先判断一下request后有没有取消,有的话就finish掉自己,然后等待下一个request的到来
 if (request.isCanceled()) {
        request.finish("cache-discard-canceled");
        continue;
    }
接下来会从缓存中取缓存,没有或者缓存已经过期,就把request丢掉mNetworkQueue中,让NetworkDisptcher去“抢夺”request
 // Attempt to retrieve this item from cache.
    Cache.Entry entry = mCache.get(request.getCacheKey());
    if (entry == null) {
        request.addMarker("cache-miss");
        // Cache miss; send off to the network dispatcher.
        mNetworkQueue.put(request);
        continue;
    }
      // If it is completely expired, just send it to the network.
    if (entry.isExpired()) {
        request.addMarker("cache-hit-expired");
        request.setCacheEntry(entry);
        mNetworkQueue.put(request);
        continue;
    }
若取到缓存且没过期,则解析缓存
 Response<?> response = request.parseNetworkResponse(
       new NetworkResponse(entry.data, entry.responseHeaders));
若不需要刷新则把request和response丢到ui线程中,回调request中的请求成功或失败listener,同时finish自己
若还需要刷新的话还需要把request丢到mNetworkQueue中,让NetworkDispatcher去获取数据。
NetworkDispatcher在获取到数据后执行了如下代码:
// TODO: Only update cache metadata instead of entire record for 304s.
    if (request.shouldCache() && response.cacheEntry != null) {
        mCache.put(request.getCacheKey(), response.cacheEntry);
        request.addMarker("network-cache-written");
    }
CacheDispatcher 才是处理缓存相关的,为什么 NetworkDispatcher 中还需要进行以上的判断呢?
Request#finish自己
前面我们提到过 CacheDispatcher 把相同的request放到了队列中,当获取到数据后调用了request的finish方法,该方法又调用了
mRequestQueue的finish方法。
 void finish(final String tag) {
        if (mRequestQueue != null) {
            mRequestQueue.finish(this);
        }
        ...
    }
request的finish方法如下:
<T> void finish(Request<T> request) {

        ...
        if (request.shouldCache()) {
            synchronized (mWaitingRequests) {
                String cacheKey = request.getCacheKey();
                Queue<Request<?>> waitingRequests = mWaitingRequests.remove(cacheKey);
                if (waitingRequests != null) {
                    if (VolleyLog.DEBUG) {
                        VolleyLog.v("Releasing %d waiting requests for cacheKey=%s.",
                            waitingRequests.size(), cacheKey);
                    }
                        // Process all queued up requests. They won't be considered as in flight, but
                        // that's not a problem as the cache has been primed by 'request'.
                    mCacheQueue.addAll(waitingRequests);
                }
            }
        }
    }
}
finish中取出了相同的request所在的队列,然后把请求丢到了mCacheQueue中,丢到mCacheQueue后就会导致 CacheDispatcher 去执行网络请求,
这时由于上次的请求已经缓存了,所以可以直接使用上传的数据了,到此为止request如何finish自己就介绍完了。
取消请求
我们可以调用request.cancel取消某个请求,也可以调用requestQueue的 cancelAll(RequestFilter filter) 或cancelAll(final Object tag) 取消多个请求。
我们来看一下cancelAll(RequestFilter filter) 方法
 /**
     * Cancels all requests in this queue for which the given filter applies.
     * @param filter The filtering function to use
     */
    public void cancelAll(RequestFilter filter) {
        synchronized (mCurrentRequests) {
            for (Request<?> request : mCurrentRequests) {
                if (filter.apply(request)) {
                    request.cancel();
                }
            }
        }
    }
cancelAll需要一个RequestFilter,RequestFilter是一个接口,代码如下
 /**
     * A simple predicate or filter interface for Requests, for use by
     * {@link RequestQueue#cancelAll(RequestFilter)}.
     */
    public interface RequestFilter {
        public boolean apply(Request<?> request);
    }
我们可以通过实现自己的RequestFilter来取消特定的请求,比如我们可以在apply中判断request的url是不是http://api.mogujie.org/gw/mwp.timelinemwp.homeListActionlet/1/?data=xxx,若是则返回true,否则返回false,这样就可以结束特定url的请求。
cancelAll(final Object tag)中自己实现了一个RequestFilter,根据tag来结束特定请求,代码如下:
 /**
     * Cancels all requests in this queue with the given tag. Tag must be non-null
     * and equality is by identity.
     */
    public void cancelAll(final Object tag) {
        if (tag == null) {
            throw new IllegalArgumentException("Cannot cancelAll with a null tag");
        }
        cancelAll(new RequestFilter() {
            @Override
            public boolean apply(Request<?> request) {
                return request.getTag() == tag;
            }
        });
    }
根据以上代码可以看出,最终都是调用了request的cancel方法,cancel中只是简单的标记了一下该request需要结束,代码如下:
  /**
     * Mark this request as canceled.  No callback will be delivered.
     */
    public void cancel() {
        mCanceled = true;
    }
Volley会在执行网络请求前和回调监听前判断一下标记位是否已取消,若取消就结束自己,不再执行网络请求,也不回调,从而达到取消请求的效果。代码如下:
NetworkDispatcher 和 CacheDispatcher
    @Override
    public void run() {
       ...
        while (true) {
            try {
               ...
                final Request<?> request = mCacheQueue.take();
               ...
                if (request.isCanceled()) {
                    request.finish("cache-discard-canceled");
                    continue;
                }
           }

       }
   }
ExecutorDelivery中
    public void run() {

            if (mRequest.isCanceled()) {
                mRequest.finish("canceled-at-delivery");
                return;
            }

            // Deliver a normal response or error, depending.
            if (mResponse.isSuccess()) {
                mRequest.deliverResponse(mResponse.result);
            } else {
                mRequest.deliverError(mResponse.error);
            }
缓存处理
HttpHeaderParser.parseCacheHeaders
处理字符串(分割等)得到响应头,并把响应头,body包装到Cache.Entry中返回。
当NetworkDispatcher请求到数据后会判断requset是否需要缓存,需要的话会调用DiskBasedCache的put(String key, Entry entry)方法,key是url,put中先调用了pruneIfNeeded,如果缓存新的数据后超过规定大小就先删除一部分。
  /**
     * Prunes the cache to fit the amount of bytes specified.
     * @param neededSpace The amount of bytes we are trying to fit into the cache.
     */
    private void pruneIfNeeded(int neededSpace) {
        if ((mTotalSize + neededSpace) < mMaxCacheSizeInBytes) {
            return;
        }
        long before = mTotalSize;

        Iterator<Map.Entry<String, CacheHeader>> iterator = mEntries.entrySet().iterator();
        while (iterator.hasNext()) {
            Map.Entry<String, CacheHeader> entry = iterator.next();
            CacheHeader e = entry.getValue();
            boolean deleted = getFileForKey(e.key).delete();
            if (deleted) {
                mTotalSize -= e.size;
            }
            iterator.remove();
            if ((mTotalSize + neededSpace) < mMaxCacheSizeInBytes * HYSTERESIS_FACTOR) {
                break;
            }
        }
    }
put中可以看到数据被保存到了文件中。
 /**
     * Puts the entry with the specified key into the cache.
     */
    @Override
    public synchronized void put(String key, Entry entry) {
        pruneIfNeeded(entry.data.length);
        File file = getFileForKey(key);
        try {
            BufferedOutputStream fos = new BufferedOutputStream(new FileOutputStream(file));
            CacheHeader e = new CacheHeader(key, entry);
            boolean success = e.writeHeader(fos);
            if (!success) {
                fos.close();
                VolleyLog.d("Failed to write header for %s", file.getAbsolutePath());
                throw new IOException();
            }
            fos.write(entry.data);
            fos.close();
            putEntry(key, e);
            return;
        } catch (IOException e) {
        }
        boolean deleted = file.delete();
        if (!deleted) {
            VolleyLog.d("Could not clean up file %s", file.getAbsolutePath());
        }
    }
Request请求失败重试机制
Volley的请求重试机制是在Request中设置的,这样的好处是每一个Request都可以有自己的重试机制,代码如下
  /**
     * Creates a new request with the given method (one of the values from {@link Method}),
     * URL, and error listener.  Note that the normal response listener is not provided here as
     * delivery of responses is provided by subclasses, who have a better idea of how to deliver
     * an already-parsed response.
     */
    public Request(int method, String url, Response.ErrorListener listener) {
        mMethod = method;
        mUrl = url;
        mErrorListener = listener;
        setRetryPolicy(new DefaultRetryPolicy());

        mDefaultTrafficStatsTag = findDefaultTrafficStatsTag(url);
    }
Request#setRetryPolicy中只是记录了一下RetryPolicy
/**
     * Sets the retry policy for this request.
     *
     * @return This Request object to allow for chaining.
     */
    public Request<?> setRetryPolicy(RetryPolicy retryPolicy) {
        mRetryPolicy = retryPolicy;
        return this;
    }
DefaultRetryPolicy实现了RetryPolicy接口,根据接口我们可以看到DefaultRetryPolicy可以提供当前超时时间,当前重试次数等
/**
 * Retry policy for a request.
 */
public interface RetryPolicy {

    /**
     * Returns the current timeout (used for logging).
     */
    public int getCurrentTimeout();

    /**
     * Returns the current retry count (used for logging).
     */
    public int getCurrentRetryCount();

    /**
     * Prepares for the next retry by applying a backoff to the timeout.
     * @param error The error code of the last attempt.
     * @throws VolleyError In the event that the retry could not be performed (for example if we
     * ran out of attempts), the passed in error is thrown.
     */
    public void retry(VolleyError error) throws VolleyError;
}
BasicNetwork中performRequest中请求失败(SocketTimeoutException,ConnectTimeoutException等)时会再次请求一次(默认重试一次)
若还是失败就会抛出VolleyError异常
具体代码如下:
public NetworkResponse performRequest(Request<?> request) throws VolleyError {
        ...
        while (true) {
            ...
            try {
                ...
                httpResponse = mHttpStack.performRequest(request, headers);
                ...
                return new NetworkResponse(statusCode, responseContents, responseHeaders, false,
                    SystemClock.elapsedRealtime() - requestStart);
            } catch (SocketTimeoutException e) {
                attemptRetryOnException("socket", request, new TimeoutError());
            } catch (ConnectTimeoutException e) {
                attemptRetryOnException("connection", request, new TimeoutError());
            } catch (MalformedURLException e) {
                throw new RuntimeException("Bad URL " + request.getUrl(), e);
            } catch (IOException e) {
                ...
            }
        }
    }
attemptRetryOnException代码如下:
 private static void attemptRetryOnException(String logPrefix, Request<?> request,
            VolleyError exception) throws VolleyError {
        RetryPolicy retryPolicy = request.getRetryPolicy();
        int oldTimeout = request.getTimeoutMs();

        try {
            retryPolicy.retry(exception);
        } catch (VolleyError e) {
            request.addMarker(
                    String.format("%s-timeout-giveup [timeout=%s]", logPrefix, oldTimeout));
            throw e;
        }
        request.addMarker(String.format("%s-retry [timeout=%s]", logPrefix, oldTimeout));
    }
request.getRetryPolicy()得到的是DefaultRetryPolicy类,DefaultRetryPolicy中retry方法
    public void retry(VolleyError error) throws VolleyError {
        mCurrentRetryCount++;
        mCurrentTimeoutMs += (mCurrentTimeoutMs * mBackoffMultiplier);
        if (!hasAttemptRemaining()) {
            throw error;
        }
    }

    //Returns true if this policy has attempts remaining, false otherwise.
    protected boolean hasAttemptRemaining() {
        return mCurrentRetryCount <= mMaxNumRetries;
    }
request.getRetryPolicy() 得到的是 DefaultRetryPolicy 对象,request重试次数超过规定的次数时
attemptRetryOnException 就会抛出 VolleyError,从而导致 performRequest() 方法中 while
循环终止,同时继续向上抛异常。
PoolingByteArrayOutputStream & ByteArrayPool
为了避免读取服务端数据时反复的内存申请,Volley提供了PoolingByteArrayOutputStream和ByteArrayPool。
我们先看一下PoolingByteArrayOutputStream的父类ByteArrayOutputStream
/**
     * The byte array containing the bytes written.
     */
    protected byte[] buf;

    /**
     * The number of bytes written.
     */
    protected int count;
ByteArrayOutputStream中提供了两个protected 的byte[] buf 和 int count,buf用于write时保存数据,count记录buf已使用的大小,因为都是protected,所有在子类中可以对其进行修改。
我们来看一下ByteArrayOutputStream的write方法,可以看到write中调用了扩展buf大小的expand方法,再来看一下expand的具体实现
  private void expand(int i) {
        /* Can the buffer handle @i more bytes, if not expand it */
        if (count + i <= buf.length) {
            return;
        }

        byte[] newbuf = new byte[(count + i) * 2];
        System.arraycopy(buf, 0, newbuf, 0, count);
        buf = newbuf;
    }
可以看到当已使用的空间+要写入的大小>buf大小时,直接new 了一个两倍大小的空间,并把原来的buf中的数据复制到了新的空间中,最后把新分配的空间赋值给了buf,原来的buf由于没有被任何对象持有,最终会被回收掉。PoolingByteArrayOutputStream就是在重写的expand对buf进行了处理。
 @Override
    public synchronized void write(byte[] buffer, int offset, int len) {
        Arrays.checkOffsetAndCount(buffer.length, offset, len);
        if (len == 0) {
            return;
        }
        expand(len);
        System.arraycopy(buffer, offset, buf, this.count, len);
        this.count += len;
    }

    /**
     * Writes the specified byte {@code oneByte} to the OutputStream. Only the
     * low order byte of {@code oneByte} is written.
     *
     * @param oneByte
     *            the byte to be written.
     */
    @Override
    public synchronized void write(int oneByte) {
        if (count == buf.length) {
            expand(1);
        }
        buf[count++] = (byte) oneByte;
    }
接下来我们看一下PoolingByteArrayOutputStream是怎么复用内存空间的。
在执行网络请求的BasicNetwork我们看到new 了一个ByteArrayPool
 /**
     * @param httpStack HTTP stack to be used
     */
    public BasicNetwork(HttpStack httpStack) {
        // If a pool isn't passed in, then build a small default pool that will give us a lot of
        // benefit and not use too much memory.
        this(httpStack, new ByteArrayPool(DEFAULT_POOL_SIZE));
    }
我们看一下ByteArrayPool的构造函数
 /** The buffer pool, arranged both by last use and by buffer size */
    private List<byte[]> mBuffersByLastUse = new LinkedList<byte[]>();
    private List<byte[]> mBuffersBySize = new ArrayList<byte[]>(64);

 /**
     * @param sizeLimit the maximum size of the pool, in bytes
     */
    public ByteArrayPool(int sizeLimit) {
        mSizeLimit = sizeLimit;
    }
可以看到ByteArrayPool只是记录了一下最大的内存池空间,默认是4096 bytes,并创建了两个保存byte[]数组的List。
为什么要有两个List<byte[]> , mBuffersBySize用于二分查找,(int pos = Collections.binarySearch(mBuffersBySize, buf, BUF_COMPARATOR);)。mBuffersByLastUse用于LRU(Least recently used,最近最少使用)置换算法。
我们从BasicNetwork中看到读取服务端数据时调用了entityToBytes方法
  /** Reads the contents of HttpEntity into a byte[]. */
    private byte[] entityToBytes(HttpEntity entity) throws IOException, ServerError {
        PoolingByteArrayOutputStream bytes =
                new PoolingByteArrayOutputStream(mPool, (int) entity.getContentLength());
        byte[] buffer = null;
        try {
            InputStream in = entity.getContent();
            if (in == null) {
                throw new ServerError();
            }
            buffer = mPool.getBuf(1024);
            int count;
            while ((count = in.read(buffer)) != -1) {
                bytes.write(buffer, 0, count);
            }
            return bytes.toByteArray();
        } finally {
            try {
                // Close the InputStream and release the resources by "consuming the content".
                entity.consumeContent();
            } catch (IOException e) {
                // This can happen if there was an exception above that left the entity in
                // an invalid state.
                VolleyLog.v("Error occured when calling consumingContent");
            }
            mPool.returnBuf(buffer);
            bytes.close();
        }
    }
entityToBytes中又new 了一个PoolingByteArrayOutputStream,PoolingByteArrayOutputStream是继承自java.io.ByteArrayOutputStream的。我们看一下PoolingByteArrayOutputStream构造函数
 /**
     * Constructs a new {@code ByteArrayOutputStream} with a default size of {@code size} bytes. If
     * more than {@code size} bytes are written to this instance, the underlying byte array will
     * expand.
     *
     * @param size initial size for the underlying byte array. The value will be pinned to a default
     *        minimum size.
     */
    public PoolingByteArrayOutputStream(ByteArrayPool pool, int size) {
        mPool = pool;
        buf = mPool.getBuf(Math.max(size, DEFAULT_SIZE));
    }
PoolingByteArrayOutputStream构造函数中调用了mPool.getBuf并赋值给了父类的buf,所以以后调用write时都是把数据写到了mPool.getBuf得到的byte[]数组中,也就是byte[]池中。getBuf代码如下:
 /**
     * Returns a buffer from the pool if one is available in the requested size, or allocates a new
     * one if a pooled one is not available.
     *
     * @param len the minimum size, in bytes, of the requested buffer. The returned buffer may be
     *        larger.
     * @return a byte[] buffer is always returned.
     */
    public synchronized byte[] getBuf(int len) {
        for (int i = 0; i < mBuffersBySize.size(); i++) {
            byte[] buf = mBuffersBySize.get(i);
            if (buf.length >= len) {
                mCurrentSize -= buf.length;
                mBuffersBySize.remove(i);
                mBuffersByLastUse.remove(buf);
                return buf;
            }
        }
        return new byte[len];
    }
由于内存池是被多个NetworkDispatcher公用的,所以getBuf前加了synchronized,getBuf就是从byte[]池中找一个满足大小的空间返回,并从List移除掉,若没有足够大的则new一个。再来看一下PoolingByteArrayOutputStream的write方法
 @Override
    public synchronized void write(byte[] buffer, int offset, int len) {
        expand(len);
        super.write(buffer, offset, len);
    }

    @Override
    public synchronized void write(int oneByte) {
        expand(1);
        super.write(oneByte);
    }
可以看到write中调用了expand方法,这个方法不是ByteArrayOutputStream中的,而是PoolingByteArrayOutputStream重写的,现在看一下expand方法
 /**
     * Ensures there is enough space in the buffer for the given number of additional bytes.
     */
    private void expand(int i) {
        /* Can the buffer handle @i more bytes, if not expand it */
        if (count + i <= buf.length) {
            return;
        }
        byte[] newbuf = mPool.getBuf((count + i) * 2);
        System.arraycopy(buf, 0, newbuf, 0, count);
        mPool.returnBuf(buf);
        buf = newbuf;
    }
expand中没有调用父类的expand方法,其与父类expand方法的却别就是由每次的new byte[]变成了从byte[]池中获取。
在entityToBytes方法中我们看到用完之后又调用了mPool.returnBuf(buffer);把byte[]归还给了byte[]池,代码如下:
 /**
     * Returns a buffer to the pool, throwing away old buffers if the pool would exceed its allotted
     * size.
     *
     * @param buf the buffer to return to the pool.
     */
    public synchronized void returnBuf(byte[] buf) {
        if (buf == null || buf.length > mSizeLimit) {
            return;
        }
        mBuffersByLastUse.add(buf);
        int pos = Collections.binarySearch(mBuffersBySize, buf, BUF_COMPARATOR);
        if (pos < 0) {
            pos = -pos - 1;
        }
        mBuffersBySize.add(pos, buf);
        mCurrentSize += buf.length;
        trim();
    }

    /**
     * Removes buffers from the pool until it is under its size limit.
     */
    private synchronized void trim() {
        while (mCurrentSize > mSizeLimit) {
            byte[] buf = mBuffersByLastUse.remove(0);
            mBuffersBySize.remove(buf);
            mCurrentSize -= buf.length;
        }
    }
Volley加载图片
Volley除了可以获取json还可以加载图片,用法如下:
ImageRequest imageRequest = new ImageRequest(url,
        new Response.Listener<Bitmap>() {
            @Override
            public void onResponse(Bitmap response) {
                imageView.setImageBitmap(response);
            }
        }, 0, 0, Config.RGB_565, new Response.ErrorListener() {
            @Override
            public void onErrorResponse(VolleyError error) {
                imageView.setImageResource(R.drawable.default_image);
            }
        });
ImageRequest的构造函数接收6个参数,第一个参数就是图片的URL地址。第二个参数是图片请求成功的回调,这里我们把返回的Bitmap参数设置到ImageView中。第三第四个参数分别用于指定允许图片最大的宽度和高度,如果指定的网络图片的宽度或高度大于这里的最大值,则会对图片进行压缩,指定成0的话就表示不管图片有多大,都不会进行压缩。第五个参数用于指定图片的颜色属性,Bitmap.Config下的几个常量都可以在这里使用,其中ARGB_8888可以展示最好的颜色属性,每个图片像素占据4个字节的大小,而RGB_565则表示每个图片像素占据2个字节大小。第六个参数是图片请求失败的回调,这里我们当请求失败时在ImageView中显示一张默认图片。
ImageRequest默认采用GET方式获取图片,采用ScaleType.CENTER_INSIDE方式缩放图片
 public ImageRequest(String url, Response.Listener<Bitmap> listener, int maxWidth, int maxHeight,
            ScaleType scaleType, Config decodeConfig, Response.ErrorListener errorListener) {
        super(Method.GET, url, errorListener);
        setRetryPolicy(new DefaultRetryPolicy(DEFAULT_IMAGE_TIMEOUT_MS, DEFAULT_IMAGE_MAX_RETRIES,
                DEFAULT_IMAGE_BACKOFF_MULT));
        mListener = listener;
        mDecodeConfig = decodeConfig;
        mMaxWidth = maxWidth;
        mMaxHeight = maxHeight;
        mScaleType = scaleType;
    }

    /**
     * For API compatibility with the pre-ScaleType variant of the constructor. Equivalent to
     * the normal constructor with {@code ScaleType.CENTER_INSIDE}.
     */
    @Deprecated
    public ImageRequest(String url, Response.Listener<Bitmap> listener, int maxWidth, int maxHeight,
            Config decodeConfig, Response.ErrorListener errorListener) {
        this(url, listener, maxWidth, maxHeight,
                ScaleType.CENTER_INSIDE, decodeConfig, errorListener);
    }
我们来看一下ImageRequest具体执行逻辑
  @Override
    protected Response<Bitmap> parseNetworkResponse(NetworkResponse response) {
        // Serialize all decode on a global lock to reduce concurrent heap usage.
        synchronized (sDecodeLock) {
            try {
                return doParse(response);
            } catch (OutOfMemoryError e) {
                VolleyLog.e("Caught OOM for %d byte image, url=%s", response.data.length, getUrl());
                return Response.error(new ParseError(e));
            }
        }
    }

    /**
     * The real guts of parseNetworkResponse. Broken out for readability.
     */
    private Response<Bitmap> doParse(NetworkResponse response) {
        byte[] data = response.data;
        BitmapFactory.Options decodeOptions = new BitmapFactory.Options();
        Bitmap bitmap = null;
        if (mMaxWidth == 0 && mMaxHeight == 0) {
            decodeOptions.inPreferredConfig = mDecodeConfig;
            bitmap = BitmapFactory.decodeByteArray(data, 0, data.length, decodeOptions);
        } else {
            // If we have to resize this image, first get the natural bounds.
            decodeOptions.inJustDecodeBounds = true;
            BitmapFactory.decodeByteArray(data, 0, data.length, decodeOptions);
            int actualWidth = decodeOptions.outWidth;
            int actualHeight = decodeOptions.outHeight;

            // Then compute the dimensions we would ideally like to decode to.
            int desiredWidth = getResizedDimension(mMaxWidth, mMaxHeight,
                    actualWidth, actualHeight, mScaleType);
            int desiredHeight = getResizedDimension(mMaxHeight, mMaxWidth,
                    actualHeight, actualWidth, mScaleType);

            // Decode to the nearest power of two scaling factor.
            decodeOptions.inJustDecodeBounds = false;
            // TODO(ficus): Do we need this or is it okay since API 8 doesn't support it?
            // decodeOptions.inPreferQualityOverSpeed = PREFER_QUALITY_OVER_SPEED;
            decodeOptions.inSampleSize =
                findBestSampleSize(actualWidth, actualHeight, desiredWidth, desiredHeight);
            Bitmap tempBitmap =
                BitmapFactory.decodeByteArray(data, 0, data.length, decodeOptions);

            // If necessary, scale down to the maximal acceptable size.
            if (tempBitmap != null && (tempBitmap.getWidth() > desiredWidth ||
                    tempBitmap.getHeight() > desiredHeight)) {
                bitmap = Bitmap.createScaledBitmap(tempBitmap,
                        desiredWidth, desiredHeight, true);
                tempBitmap.recycle();
            } else {
                bitmap = tempBitmap;
            }
        }

        if (bitmap == null) {
            return Response.error(new ParseError(response));
        } else {
            return Response.success(bitmap, HttpHeaderParser.parseCacheHeaders(response));
        }
    }
doParse中对图片进行了缩放处理,可以看到当mMaxWidth == 0 && mMaxHeight == 0时,没有做过多的处理,这种情况适合于不打的图片,否则容易导致内存溢出。else中对图片进行了缩放处理,首先创建一个Options 对象,并设置decodeOptions.inJustDecodeBounds = true,然后使用BitmapFactory.decodeByteArray(data, 0, data.length, decodeOptions);时就可以只获取图片的大小,而不需要把data数组转换成bitmap,
BitmapFactory.decodeByteArray(data, 0, data.length, decodeOptions);可以直接从内存中获取图片的宽高,之后就可以使用
int actualWidth = decodeOptions.outWidth;
int actualHeight = decodeOptions.outHeight;
来获取图片宽高了。
获取到图片宽高后需要通过findBestSampleSize找到一个合适的缩放比例并赋值给decodeOptions.inSampleSize,缩放比例一定是2的n次幂。即使不是2的幂最终也会按2的n次幂处理
 static int findBestSampleSize(
            int actualWidth, int actualHeight, int desiredWidth, int desiredHeight) {
        double wr = (double) actualWidth / desiredWidth;
        double hr = (double) actualHeight / desiredHeight;
        double ratio = Math.min(wr, hr);
        float n = 1.0f;
        while ((n * 2) <= ratio) {
            n *= 2;
        }

        return (int) n;
    }
 /**
        * If set to a value > 1, requests the decoder to subsample the original
        * image, returning a smaller image to save memory. The sample size is
        * the number of pixels in either dimension that correspond to a single
        * pixel in the decoded bitmap. For example, inSampleSize == 4 returns
        * an image that is 1/4 the width/height of the original, and 1/16 the
        * number of pixels. Any value <= 1 is treated the same as 1. Note: the
        * decoder uses a final value based on powers of 2, any other value will
        * be rounded down to the nearest power of 2.
        */
       public int inSampleSize;
获取到缩放比例后就可以通过一下代码获取到图片了
decodeOptions.inJustDecodeBounds = false;
decodeOptions.inSampleSize =
               findBestSampleSize(actualWidth, actualHeight, desiredWidth, desiredHeight);
Bitmap tempBitmap =BitmapFactory.decodeByteArray(data, 0, data.length, decodeOptions);
Handler
Volley进行网络请求是在非ui线程中进行的,回调是怎么跑到ui线程中执行的呢?
Volley在创建RequestQueue时new 了一个 ExecutorDelivery(new Handler(Looper.getMainLooper()))
 public RequestQueue(Cache cache, Network network, int threadPoolSize) {
        this(cache, network, threadPoolSize,
                new ExecutorDelivery(new Handler(Looper.getMainLooper())));
    }
以前使用handler时我们都是直接new Handler(),没有跟任何参数,但不跟参数的Handler默认使用的是该线程独有的Looper,默认情况下ui线程是有Looper的而其他线程是没有Looper的,在非UI线程中直接new Handler()会出错,我们可以通过Looper.getMainLooper()得到ui线程的Looper,这样任何线程都可以使用ui线程的Looper了,而且可以在任何线程中创建Handler,并且使用handler发送消息时就会跑到ui线程执行了。
也就是说如果我们想在任何线程中都可以创建Hadler,并且handler发送的消息要在ui线程执行的话,就可以采用这种方式创建Handler
new Handler(Looper.getMainLooper());
volley gson改造
在实际开发中我们会遇到对文字表情的混排处理,一种做法是服务端直接返回转意后的字符串(比如 ☺ 用 \:wx 代替),然后客户端每次都要在ui线程中解析字符串转换成Spanned,若是在ListView中,滚动就会非常卡顿。
我们可以自定义一个XJsonRequest<T>并继承自Request<T>,同时为XJsonRequest增加一个注册gson类型转换的方法,并把泛型参数中图文混排字段设置为Spanned,然后在Response<String> parseNetworkResponse(NetworkResponse response)中把图文混拍json转换成Spanned即可,由于Response<String> parseNetworkResponse(NetworkResponse response)是在非ui线程中执行的,所已不会导致ANR。
demo如下:
先看效果图:

代码如下:
String json = "{\"nickname\":\"xiaoming\",\"age\":10,\"emoj\":\"[:f001}[:f002}[:f003}hello[:f004}[:f005}\"}";
        jsonTv.setText(json);

        Gson gson = new GsonBuilder().registerTypeAdapter(Spanned.class, new String2Spanned()).create();

        Person person = gson.fromJson(json, Person.class);

        editText.append(person.getNickname());
        editText.append(" ");
        editText.append(person.getAge() + " ");
        editText.append(person.getEmoj());

        tv.append(Spanned2String.parse(editText.getText()));
public  class Person {
    private Spanned emoj;
    private String nickname;
    private int age;
}
/**
 * 字符串转表情Spanned 表情格式 [:f000}
 *
 * @author wanjian
 *
 */
public class String2Spanned extends TypeAdapter<Spanned> {

    static Pattern pattern;

    static Map<String, Integer> map = new HashMap<String, Integer>();

    static ImageGetter imageGetter = new ImageGetter() {
        @Override
        public Drawable getDrawable(String source) {
            int id = Integer.parseInt(source);
            Drawable d = MyApplication.application.getResources().getDrawable(id);
            d.setBounds(0, 0, d.getIntrinsicWidth(), d.getIntrinsicHeight());
            return d;
        }
    };

    static {

        pattern = Pattern.compile("\\[:f\\d{3}\\}");
        //省略部分代码
        map.put("[:f000}", R.drawable.f000);
        map.put("[:f001}", R.drawable.f001);
        map.put("[:f002}", R.drawable.f002);
        map.put("[:f003}", R.drawable.f003);
        map.put("[:f004}", R.drawable.f004);
        map.put("[:f005}", R.drawable.f005);
    }

    @Override
    public Spanned read(JsonReader in) throws IOException {
        if (in.peek() == JsonToken.NULL) {
            in.nextNull();
            return null;
        }

        String origStr = in.nextString();
        Matcher matcher = pattern.matcher(origStr);

        StringBuilder stringBuilder = new StringBuilder();

        int last = 0;
        while (matcher.find()) {

            int s = matcher.start();
            int e = matcher.end();
            stringBuilder.append(origStr.substring(last, s));

            String group = matcher.group();
            Integer emojId = map.get(group);
            if (emojId == null) {
                stringBuilder.append(group);
            } else {
                stringBuilder.append("<img src='");
                stringBuilder.append(emojId);
                stringBuilder.append("'/>");
            }

            last = e;

        }
        stringBuilder.append(origStr.substring(last, origStr.length()));
                // String ss = "[站外图片上传中……(4)]";

        return Html.fromHtml(stringBuilder.toString(), imageGetter, null);
    }

    @Override
    public void write(JsonWriter arg0, Spanned arg1) throws IOException {

    }

}
import org.apache.commons.lang.StringEscapeUtils;
/**
 * 表情转 字符串
 * @author wanjian
 *
 */
public class Spanned2String {

    //  <p dir="ltr">[站外图片上传中……(5)][站外图片上传中……(6)]</p>
    //   <p dir="ltr">hello</p>

    static Pattern pattern;
    static Map<String,String>map=new HashMap<>();
    static{
        pattern=Pattern.compile("<img src=\"\\d+\">");
          //省略部分代码
        map.put(String.valueOf(R.drawable.f000) , "[:f000}");
        map.put(String.valueOf(R.drawable.f001) , "[:f001}");
        map.put(String.valueOf(R.drawable.f002) , "[:f002}");
        map.put(String.valueOf(R.drawable.f003) , "[:f003}");
        map.put(String.valueOf(R.drawable.f004) , "[:f004}");
    }
    public static String decode(String str) {
      String[] tmp = str.split(";&#|&#|;");
      StringBuilder sb = new StringBuilder("");
      for (int i = 0; i < tmp.length; i++) {
        if (tmp[i].matches("\\d{5}")) {
          sb.append((char) Integer.parseInt(tmp[i]));
        } else {
          sb.append(tmp[i]);
        }
      }
      return sb.toString();
    }

    public static String parse(Spanned spanned  ) {

        try {

            String origHtml= Html.toHtml(spanned);
            //某些机型Html.toHtml得到的字符串略有区别,需要处理下
            //模拟器:  <p dir="ltr">慢慢</p>
            //小米2A <p dir=ltr>慢慢</p>

            String origStr=origHtml.substring(origHtml.indexOf(">")+1, origHtml.length()-5);
            origStr=StringEscapeUtils.unescapeHtml(origStr);//html 汉字实体编码转换
            Matcher matcher=pattern.matcher(origStr);

           //      [站外图片上传中……(7)]hello[站外图片上传中……(8)]
            StringBuilder stringBuilder=new StringBuilder();
            int last=0;
            while (matcher.find()) {
                int s= matcher.start();
                int e=matcher.end();

                stringBuilder.append(origStr.substring( last,s));

                String group=matcher.group();
                String id=group.substring(10, group.length()-2);

                String emojStr=map.get(id);
                if (emojStr==null) {
                    stringBuilder.append(group);

                }else{
                    stringBuilder.append(emojStr);

                }

                last=e;

            }
            stringBuilder.append(origStr.substring(last, origStr.length()));
            return stringBuilder.toString().replace("<br>", "\n");

        } catch (Exception e) {
            // TODO Auto-generated catch block
            e.printStackTrace();

            return "";
        }

    }

}
volley okhttp改造
public class OkHttpStack implements HttpStack {
    private final OkHttpClient mClient;

    public OkHttpStack(OkHttpClient client) {
        this.mClient = client;
    }

    @Override
    public HttpResponse performRequest(com.android.volley.Request<?> request, Map<String, String> additionalHeaders)
            throws IOException, AuthFailureError {
        OkHttpClient client = mClient.clone();
        int timeoutMs = request.getTimeoutMs();
        client.setConnectTimeout(timeoutMs, TimeUnit.MILLISECONDS);
        client.setReadTimeout(timeoutMs, TimeUnit.MILLISECONDS);
        client.setWriteTimeout(timeoutMs, TimeUnit.MILLISECONDS);

        com.squareup.okhttp.Request.Builder okHttpRequestBuilder = new com.squareup.okhttp.Request.Builder();
        okHttpRequestBuilder.url(request.getUrl());

        Map<String, String> headers = request.getHeaders();

        for (final String name : headers.keySet()) {
            if (name!=null&& headers.get(name)!=null) {
                okHttpRequestBuilder.addHeader(name, headers.get(name));
            }

        }

        for (final String name : additionalHeaders.keySet()) {
            if (name!=null&& headers.get(name)!=null)
                okHttpRequestBuilder.addHeader(name, additionalHeaders.get(name));
        }

        setConnectionParametersForRequest(okHttpRequestBuilder, request);

        com.squareup.okhttp.Request okHttpRequest = okHttpRequestBuilder.build();
        Response okHttpResponse = client.newCall(okHttpRequest).execute();

        StatusLine responseStatus = new BasicStatusLine(parseProtocol(okHttpResponse.protocol()), okHttpResponse.code(),
                okHttpResponse.message());

        BasicHttpResponse response = new BasicHttpResponse(responseStatus);
        response.setEntity(entityFromOkHttpResponse(okHttpResponse));

        Headers responseHeaders = okHttpResponse.headers();

        for (int i = 0, len = responseHeaders.size(); i < len; i++) {
            final String name = responseHeaders.name(i), value = responseHeaders.value(i);

            if (name != null) {
                response.addHeader(new BasicHeader(name, value));
            }
        }

        return response;
    }

    private static HttpEntity entityFromOkHttpResponse(Response r) throws IOException {
        BasicHttpEntity entity = new BasicHttpEntity();
        ResponseBody body = r.body();

        entity.setContent(body.byteStream());
        entity.setContentLength(body.contentLength());
        entity.setContentEncoding(r.header("Content-Encoding"));

        if (body.contentType() != null) {
            entity.setContentType(body.contentType().type());
        }
        return entity;
    }


    private static void setConnectionParametersForRequest(com.squareup.okhttp.Request.Builder builder,
            com.android.volley.Request<?> request) throws IOException, AuthFailureError {
        switch (request.getMethod()) {
        case com.android.volley.Request.Method.DEPRECATED_GET_OR_POST:
            // Ensure backwards compatibility.
            // Volley assumes a request with a null body is a GET.
            byte[] postBody = request.getPostBody();

            if (postBody != null) {
                builder.post(RequestBody.create(MediaType.parse(request.getPostBodyContentType()), postBody));
            }
            break;

        case com.android.volley.Request.Method.GET:
            builder.get();
            break;

        case com.android.volley.Request.Method.DELETE:
            builder.delete();
            break;

        case com.android.volley.Request.Method.POST:
            builder.post(createRequestBody(request));
            break;

        case com.android.volley.Request.Method.PUT:
            builder.put(createRequestBody(request));
            break;

        // case com.android.volley.Request.Method.HEAD:
        // builder.head();
        // break;
        //
        // case com.android.volley.Request.Method.OPTIONS:
        // builder.method("OPTIONS", null);
        // break;
        //
        // case com.android.volley.Request.Method.TRACE:
        // builder.method("TRACE", null);
        // break;
        //
        // case com.android.volley.Request.Method.PATCH:
        // builder.patch(createRequestBody(request));
        // break;

        default:
            throw new IllegalStateException("Unknown method type.");
        }
    }

    private static ProtocolVersion parseProtocol(final Protocol p) {
        switch (p) {
        case HTTP_1_0:
            return new ProtocolVersion("HTTP", 1, 0);
        case HTTP_1_1:
            return new ProtocolVersion("HTTP", 1, 1);
        case SPDY_3:
            return new ProtocolVersion("SPDY", 3, 1);
        case HTTP_2:
            return new ProtocolVersion("HTTP", 2, 0);
        }

        throw new IllegalAccessError("Unkwown protocol");
    }

    private static RequestBody createRequestBody(com.android.volley.Request<?> r) throws AuthFailureError {
        final byte[] body = r.getBody();
        if (body == null)
            return null;

        return RequestBody.create(MediaType.parse(r.getBodyContentType()), body);
    }
}
