前言
在tftp那篇文章中我提到过一般网络安装基于Linux下PXE+TFTP+DHCP+(HTTP/FTP/NFS)来实现,然而在真实的生产环境中分别测试了Cloudboot和Cobbler,面对大量型号和配置不一样的物理机并不能满足实际需求。最后采用Windows笔记本+交换机+tftpd32+kickstart来灵活应对esxi6和rhel6.7的自动化装机,为了不依赖自动化光盘安装的低效懒人模式,中间还是踩了不少的坑。个人觉得装机并没有孰优孰劣的说法,而且未来是属于分布式存储+万兆交换机+类似VMware/OpenStack的模式,人肉装机的时代已经离我们渐行渐远。
利用tftpd32快速搭建自动化网络搞机平台
更新历史
2017年01月19日 - 初稿
阅读原文 - https://wsgzao.github.io/post/tftpd32/
扩展阅读
Tftd32 - http://tftpd32.jounin.net/
Kickstart Generator - https://access.redhat.com/labsinfo/kickstartconfig
3点建议
- PXE只是网络安装的引导方式,自动化的核心配置文件始终依赖kickstart/autoyast/autounattend等
- 文章内提到的引导介质均提取自rhel6.7镜像文件
syslinux-nonlinux-4.04-3.el6.noarch.rpm - 云霁科技的Cloudboot成熟度非常高,建议大家多参考其高质量的配置方案
CloudBoot 云启装机平台(开源版) - http://www.idcos.com/products/cloudboot-open-source


esxi
tftpd32+esxi6.0u2+kickstart+hfs
- Windows下关闭防火墙,设置IP地址为192.168.1.1/24
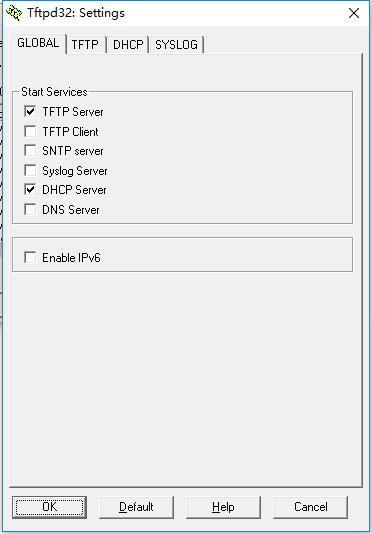
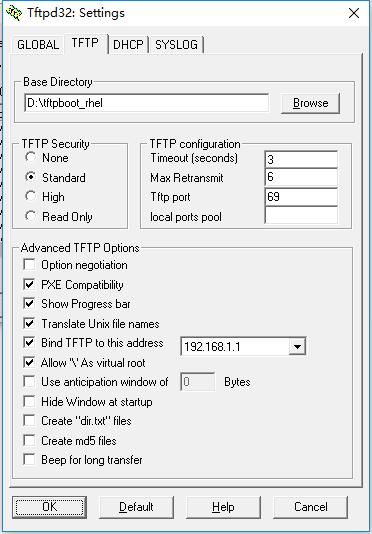
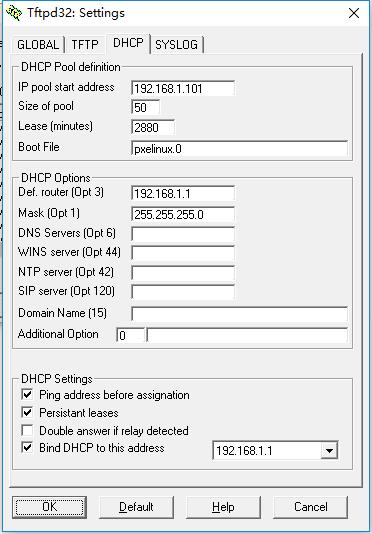
- 启动tftpd32参考上图所示配置,
Base Directory目录选择实际定义的路径,如tftpboot_esxi\ - 解压ESXi ISO至
tftpboot_esxi\,修改BOOT.CFG添加kernelopt=ks=http://192.168.1.1/esxi6/KS.CFG - 将KS.CFG放入自定义目录,使用hfs加载
- 复制syslinux中的pxelinux.0到
tftpboot_esxi\ - 复制syslinux中的MENU.C32
替换tftpboot_esxi`中的同名文件 - 创建
tftpboot_esxi\pxelinux.cfg\目录,复制ESXi ISO文件中的ISOLINUX.CFG至该目录并改名为default - 检查tftpd32服务启动正常,测试自动化网络安装esxi
#BOOT.CFG

bootstate=0
title=Loading ESXi installer
timeout=5
kernel=/tboot.b00
kernelopt=ks=http://192.168.1.1/esxi6/KS.CFG
modules=/b.b00 --- /jumpstrt.gz --- /useropts.gz --- /k.b00 --- /chardevs.b00 --- /a.b00 --- /user.b00 --- /uc_intel.b00 --- /uc_amd.b00 --- /sb.v00 --- /s.v00 --- /scsi_mpt.v00 --- /net_tg3.v00 --- /elxnet.v00 --- /ima_be2i.v00 --- /lpfc.v00 --- /scsi_be2.v00 --- /amsHelpe.v00 --- /conrep.v00 --- /hpbootcf.v00 --- /hpe_buil.v00 --- /hpe_esxi.v00 --- /hpe_ilo.v00 --- /hpe_smx_.v00 --- /hponcfg.v00 --- /hpssacli.v00 --- /hptestev.v00 --- /char_hpc.v00 --- /hpnmi.v00 --- /scsi_hpd.v00 --- /scsi_hps.v00 --- /scsi_hpv.v00 --- /intelcim.v00 --- /net_i40e.v00 --- /net_igb.v00 --- /net_ixgb.v00 --- /nmlx4_co.v00 --- /nmlx4_en.v00 --- /misc_cni.v00 --- /net_bnx2.v00 --- /net_bnx2.v01 --- /net_cnic.v00 --- /net_nx_n.v00 --- /net_qlcn.v00 --- /qlnative.v00 --- /scsi_bfa.v00 --- /scsi_bnx.v00 --- /scsi_bnx.v01 --- /scsi_qla.v00 --- /mtip32xx.v00 --- /ata_pata.v00 --- /ata_pata.v01 --- /ata_pata.v02 --- /ata_pata.v03 --- /ata_pata.v04 --- /ata_pata.v05 --- /ata_pata.v06 --- /ata_pata.v07 --- /block_cc.v00 --- /ehci_ehc.v00 --- /emulex_e.v00 --- /weaselin.t00 --- /esx_dvfi.v00 --- /esx_ui.v00 --- /ima_qla4.v00 --- /ipmi_ipm.v00 --- /ipmi_ipm.v01 --- /ipmi_ipm.v02 --- /lsi_mr3.v00 --- /lsi_msgp.v00 --- /lsu_hp_h.v00 --- /lsu_lsi_.v00 --- /lsu_lsi_.v01 --- /lsu_lsi_.v02 --- /lsu_lsi_.v03 --- /lsu_lsi_.v04 --- /misc_dri.v00 --- /net_e100.v00 --- /net_e100.v01 --- /net_enic.v00 --- /net_forc.v00 --- /net_mlx4.v00 --- /net_mlx4.v01 --- /net_vmxn.v00 --- /nmlx4_rd.v00 --- /nvme.v00 --- /ohci_usb.v00 --- /rste.v00 --- /sata_ahc.v00 --- /sata_ata.v00 --- /sata_sat.v00 --- /sata_sat.v01 --- /sata_sat.v02 --- /sata_sat.v03 --- /sata_sat.v04 --- /scsi_aac.v00 --- /scsi_adp.v00 --- /scsi_aic.v00 --- /scsi_fni.v00 --- /scsi_ips.v00 --- /scsi_meg.v00 --- /scsi_meg.v01 --- /scsi_meg.v02 --- /scsi_mpt.v01 --- /scsi_mpt.v02 --- /uhci_usb.v00 --- /vsan.v00 --- /vsanheal.v00 --- /vsanmgmt.v00 --- /xhci_xhc.v00 --- /tools.t00 --- /nmst.v00 --- /xorg.v00 --- /imgdb.tgz --- /imgpayld.tgz
build=
updated=0
#default

DEFAULT menu.c32
MENU TITLE ESXi6.0u2 Boot Menu
NOHALT 1
PROMPT 0
TIMEOUT 80
LABEL install
  KERNEL mboot.c32
  APPEND -c boot.cfg
  MENU LABEL ESXi6.0u2 ^Installer
LABEL hddboot
  LOCALBOOT 0x80
  MENU LABEL ^Boot from local disk
#KS.CFG

# Accept the VMware End User License Agreement
vmaccepteula

# Set the root password for the DCUI and Tech Support Mode
rootpw admin123
# Install on the first local disk available on machine
install --firstdisk --overwritevmfs

# Set the network to DHCP on the first network adapter
network --bootproto=dhcp --device=vmnic0

# Reboot at the end
reboot
file://H:\01_autoinstall\tftpboot_esxi  (3 folders, 129 files, 377.76 MB, 379.93 MB in total.)
│  .DISCINFO 33 bytes
│  A.B00 10.96 KB
│  AMSHELPE.V00  1.32 MB
│  ATA_PATA.V00  8.28 KB
│  ATA_PATA.V01  6.22 KB
│  ATA_PATA.V02  6.47 KB
│  ATA_PATA.V03  7.22 KB
│  ATA_PATA.V04  8.33 KB
│  ATA_PATA.V05  7.01 KB
│  ATA_PATA.V06  6.17 KB
│  ATA_PATA.V07  7.59 KB
│  B.B00 75.03 KB
│  BLOCK_CC.V00  23.75 KB
│  BOOT.CAT  512 bytes
│  BOOT.CFG  2.07 KB
│  CHAR_HPC.V00  9.93 KB
│  CHARDEVS.B00  18.67 KB
│  CONREP.V00    1.87 MB
│  EFIBOOT.IMG   1.00 MB
│  EHCI_EHC.V00  32.99 KB
│  ELXNET.V00    132.88 KB
│  EMULEX_E.V00  5.68 KB
│  ESX_DVFI.V00  89.19 KB
│  ESX_UI.V00    2.83 MB
│  HPBOOTCF.V00  28.52 KB
│  HPE_BUIL.V00  458 bytes
│  HPE_ESXI.V00  1.51 MB
│  HPE_ILO.V00   9.50 KB
│  HPE_SMX_.V00  7.81 MB
│  HPNMI.V00 4.20 KB
│  HPONCFG.V00   96.62 KB
│  HPSSACLI.V00  4.97 MB
│  HPTESTEV.V00  6.29 KB
│  IMA_BE2I.V00  489.49 KB
│  IMA_QLA4.V00  359.39 KB
│  IMGDB.TGZ 62.35 KB
│  IMGPAYLD.TGZ  3.94 MB
│  INTELCIM.V00  94.06 KB
│  IPMI_IPM.V00  9.38 KB
│  IPMI_IPM.V01  22.99 KB
│  IPMI_IPM.V02  27.91 KB
│  ISOLINUX.BIN  14.00 KB
│  ISOLINUX.CFG  231 bytes
│  JUMPSTRT.GZ   20 bytes
│  K.B00 3.26 MB
│  KS.CFG    356 bytes
│  LPFC.V00  555.77 KB
│  LSI_MR3.V00   68.98 KB
│  LSI_MSGP.V00  117.96 KB
│  LSU_HP_H.V00  15.34 KB
│  LSU_LSI_.V00  78.96 KB
│  LSU_LSI_.V01  159.84 KB
│  LSU_LSI_.V02  78.96 KB
│  LSU_LSI_.V03  187.32 KB
│  LSU_LSI_.V04  114.35 KB
│  MBOOT.C32 84.17 KB
│  MENU.C32  60.35 KB
│  MISC_CNI.V00  5.51 KB
│  MISC_DRI.V00  1.24 MB
│  MTIP32XX.V00  67.84 KB
│  NET_BNX2.V00  178.17 KB
│  NET_BNX2.V01  1.00 MB
│  NET_CNIC.V00  48.42 KB
│  NET_E100.V00  93.66 KB
│  NET_E100.V01  108.27 KB
│  NET_ENIC.V00  43.63 KB
│  NET_FORC.V00  36.61 KB
│  NET_I40E.V00  132.01 KB
│  NET_IGB.V00   101.62 KB
│  NET_IXGB.V00  167.56 KB
│  NET_MLX4.V00  107.78 KB
│  NET_MLX4.V01  66.30 KB
│  NET_NX_N.V00  1.32 MB
│  NET_QLCN.V00  283.02 KB
│  NET_TG3.V00   107.81 KB
│  NET_VMXN.V00  30.50 KB
│  NMLX4_CO.V00  117.53 KB
│  NMLX4_EN.V00  119.73 KB
│  NMLX4_RD.V00  39.92 KB
│  NMST.V00  12.32 KB
│  NVME.V00  63.07 KB
│  OHCI_USB.V00  19.44 KB
│  pxelinux.0    26.13 KB
│  QLNATIVE.V00  731.51 KB
│  RSTE.V00  209.06 KB
│  S.V00 92.98 MB
│  SAFEBOOT.C32  61.79 KB
│  SATA_AHC.V00  19.80 KB
│  SATA_ATA.V00  11.79 KB
│  SATA_SAT.V00  17.16 KB
│  SATA_SAT.V01  10.32 KB
│  SATA_SAT.V02  10.86 KB
│  SATA_SAT.V03  8.03 KB
│  SATA_SAT.V04  6.35 KB
│  SB.V00    48.31 MB
│  SCSI_AAC.V00  52.10 KB
│  SCSI_ADP.V00  143.31 KB
│  SCSI_AIC.V00  95.67 KB
│  SCSI_BE2.V00  247.25 KB
│  SCSI_BFA.V00  1.20 MB
│  SCSI_BNX.V00  95.69 KB
│  SCSI_BNX.V01  78.25 KB
│  SCSI_FNI.V00  64.13 KB
│  SCSI_HPD.V00  937.40 KB
│  SCSI_HPS.V00  72.92 KB
│  SCSI_HPV.V00  704.64 KB
│  SCSI_IPS.V00  32.12 KB
│  SCSI_MEG.V00  28.29 KB
│  SCSI_MEG.V01  54.13 KB
│  SCSI_MEG.V02  26.45 KB
│  SCSI_MPT.V00  132.34 KB
│  SCSI_MPT.V01  147.33 KB
│  SCSI_MPT.V02  124.50 KB
│  SCSI_QLA.V00  147.12 KB
│  TBOOT.B00 43.32 KB
│  TOOLS.T00 180.67 MB
│  UC_AMD.B00    3.41 KB
│  UC_INTEL.B00  135.83 KB
│  UHCI_USB.V00  19.82 KB
│  USER.B00  447.52 KB
│  USEROPTS.GZ   20 bytes
│  VMWARE-ESX-BASE-OSL.TXT   1.13 MB
│  VMWARE-ESX-BASE-README    2.19 KB
│  VSAN.V00  6.73 MB
│  VSANHEAL.V00  168.57 KB
│  VSANMGMT.V00  1.35 MB
│  WEASELIN.T00  1.93 MB
│  XHCI_XHC.V00  72.94 KB
│  XORG.V00  1.28 MB
├─EFI   (1 folders, 0 files, 0 bytes, 193.17 KB in total.)
│  └─BOOT    (0 folders, 3 files, 193.17 KB, 193.17 KB in total.)
│          BOOT.CFG  2.04 KB
│          BOOTIA32.EFI  94.59 KB
│          BOOTX64.EFI   96.53 KB
├─pxelinux.cfg  (0 folders, 1 files, 231 bytes, 231 bytes in total.)
│      default 231 bytes
└─UPGRADE   (0 folders, 10 files, 1.98 MB, 1.98 MB in total.)
        ESXIMAGE.ZIP    874.17 KB
        EXTLINUX    62.51 KB
        ISOINFO 233.62 KB
        MBR.BIN 440 bytes
        MCOPY   584.17 KB
        METADATA.XML    1.54 KB
        METADATA.ZIP    141.08 KB
        PRECHECK.PY 72.78 KB
        PREP.PY 47.54 KB
        PROFILE.XML 8.85 KB
引用他人在Linux下的安装流程
PEX安装ESXi6 - http://blog.csdn.net/onlyshenmin/article/details/52434743
#安装dhcp、tftp-server、syslinux、xinetd。
yum install dhcp tftp-server syslinux xinetd

#挂载ESXi ISO到/mnt
mount /dev/cdrom /mnt

#修改dhcpd.conf
ddns-update-style interim;
allow booting;
allow bootp;
class "pxeclients" {
    match if substring(option vendor-class-identifier, 0, 9) = "PXEClient";
    next-server 172.16.8.7;
    filename = "pxelinux.0";
}
subnet 172.16.8.0 netmask 255.255.255.0 {
    range 172.16.8.100 172.16.8.199;
}

#启用tftp,修改/etc/xinetd.d/tftp中的disable = yes为disable = no
service tftp
{
        socket_type             = dgram
        protocol                = udp
        wait                    = yes
        user                    = root
        server                  = /usr/sbin/in.tftpd
        server_args             = -s /var/lib/tftpboot
        disable                 = no
        per_source              = 11
        cps                     = 100 2
        flags                   = IPv4
}

#复制pxelinux.0到tftp根目录
cp /usr/share/syslinux/pxelinux.0 /var/lib/tftpboot/

#新建目录/var/lib/tftpboot/pxelinux.cfg
mkdir /var/lib/tftpboot/pxelinux.cfg

#复制ESXi ISO文件中的isolinux.cfg到/var/lib/tftpboot/pxelinux.cfg/下并改名default
cp /mnt/isolinux.cfg /var/lib/tftpboot/pxelinux.cfg/default

#复制ESXi ISO中的全部文件到/var/lib/tftpboot/下
cp -a  /mnt/* /var/lib/tftpboot/

#复制syslinux自带的menu.c32到tftp根目录替换掉ESXI ISO里的menu.c32。
cp /usr/share/syslinux/menu.c32  /var/lib/tftpboot/

#重启dhcp、xinetd服务
systemctl restart dhcpd
systemctl restart xinetd

#自定义安装脚本,安装httpd,编辑脚本ks.cfg
vim /var/www/html/ks.cfg
#
# Sample scripted installation file
#
# Accept the VMware End User License Agreement
vmaccepteula
# Set the root password for the DCUI and Tech Support Mode
rootpw mypassword
# Install on the first local disk available on machine
install --firstdisk --overwritevmfs
# Set the network to DHCP on the first network adapter
network --bootproto=dhcp --device=vmnic0
# A sample post-install script
%post --interpreter=python --ignorefailure=true
import time
stampFile = open('/finished.stamp', mode='w')
stampFile.write( time.asctime() )

#编辑ESXi ISO复制过来的boot.cfg文件,添加kernelopt=ks=http://172.16.8.7/ks.cfg
vim /var/lib/tftpboot/boot.cfg

bootstate=0
title=Loading ESXi installer
timeout=5
kernel=/tboot.b00
kernelopt=ks=http://172.16.8.7/ks.cfg
modules=/b.b00 --- /jumpstrt.gz --- /useropts.gz --- /k.b00 --- /chardevs.b00 --- /a.b00 --- /user.b00 --- /uc_intel.b00 --- /uc_amd.b00 --- /sb.v00 --- /s.v00 --- /mtip32xx.v00 --- /ata_pata.v00 --- /ata_pata.v01 --- /ata_pata.v02 --- /ata_pata.v03 --- /ata_pata.v04 --- /ata_pata.v05 --- /ata_pata.v06 --- /ata_pata.v07 --- /block_cc.v00 --- /ehci_ehc.v00 --- /elxnet.v00 --- /emulex_e.v00 --- /weaselin.t00 --- /esx_dvfi.v00 --- /esx_ui.v00 --- /ima_qla4.v00 --- /ipmi_ipm.v00 --- /ipmi_ipm.v01 --- /ipmi_ipm.v02 --- /lpfc.v00 --- /lsi_mr3.v00 --- /lsi_msgp.v00 --- /lsu_hp_h.v00 --- /lsu_lsi_.v00 --- /lsu_lsi_.v01 --- /lsu_lsi_.v02 --- /lsu_lsi_.v03 --- /lsu_lsi_.v04 --- /misc_cni.v00 --- /misc_dri.v00 --- /net_bnx2.v00 --- /net_bnx2.v01 --- /net_cnic.v00 --- /net_e100.v00 --- /net_e100.v01 --- /net_enic.v00 --- /net_forc.v00 --- /net_igb.v00 --- /net_ixgb.v00 --- /net_mlx4.v00 --- /net_mlx4.v01 --- /net_nx_n.v00 --- /net_tg3.v00 --- /net_vmxn.v00 --- /nmlx4_co.v00 --- /nmlx4_en.v00 --- /nmlx4_rd.v00 --- /nvme.v00 --- /ohci_usb.v00 --- /qlnative.v00 --- /rste.v00 --- /sata_ahc.v00 --- /sata_ata.v00 --- /sata_sat.v00 --- /sata_sat.v01 --- /sata_sat.v02 --- /sata_sat.v03 --- /sata_sat.v04 --- /scsi_aac.v00 --- /scsi_adp.v00 --- /scsi_aic.v00 --- /scsi_bnx.v00 --- /scsi_bnx.v01 --- /scsi_fni.v00 --- /scsi_hps.v00 --- /scsi_ips.v00 --- /scsi_meg.v00 --- /scsi_meg.v01 --- /scsi_meg.v02 --- /scsi_mpt.v00 --- /scsi_mpt.v01 --- /scsi_mpt.v02 --- /scsi_qla.v00 --- /uhci_usb.v00 --- /vsan.v00 --- /vsanheal.v00 --- /vsanmgmt.v00 --- /xhci_xhc.v00 --- /tools.t00 --- /xorg.v00 --- /imgdb.tgz --- /imgpayld.tgz
build=
updated=0
rhel
tftpd32+rhel6.7+kickstart+hfs
- Windows下关闭防火墙,设置IP地址为192.168.1.1/24
- 启动tftpd32参考上图所示配置,
Base Directory目录选择实际定义的路径,如tftpboot_rhel\ - 解压rhel6.7 ISO至自定义目录,使用hfs作为http文件服务器
- 将ks.cfg放入自定义目录,使用hfs加载
- 复制syslinux中的
pxelinux.0/initrd.img/vesamenu.c32/vmlinuz到tftpboot_rhel\ - 创建pxelinux.cfg目录,复制rhel6.7 ISO文件中的ISOLINUX.CFG至该目录并改名为default
- 修改default文件,ks=http://192.168.1.1/rhel67/ks.cfg ksdevice=eth10,出现
multiple network devices提示一定要加入ksdevice确认网卡 - 检查tftpd32服务启动正常,测试自动化网络安装rhel
#default

default vesamenu.c32
#prompt 1
timeout 60

display boot.msg

menu background splash.jpg
menu title Welcome to Red Hat Enterprise Linux 6.7!
menu color border 0 #ffffffff #00000000
menu color sel 7 #ffffffff #ff000000
menu color title 0 #ffffffff #00000000
menu color tabmsg 0 #ffffffff #00000000
menu color unsel 0 #ffffffff #00000000
menu color hotsel 0 #ff000000 #ffffffff
menu color hotkey 7 #ffffffff #ff000000
menu color scrollbar 0 #ffffffff #00000000

label linux
  menu label ^Install or upgrade an existing system
  menu default
  kernel vmlinuz
  append initrd=initrd.img ks=http://192.168.1.1/rhel67/ks.cfg ksdevice=eth10
label vesa
  menu label Install system with ^basic video driver
  kernel vmlinuz
  append initrd=initrd.img nomodeset
label rescue
  menu label ^Rescue installed system
  kernel vmlinuz
  append initrd=initrd.img rescue
label local
  menu label Boot from ^local drive
  localboot 0xffff
label memtest86
  menu label ^Memory test
  kernel memtest
  append -
#ks.cfg

#platform=x86, AMD64, or Intel EM64T
#version=DEVEL
# Firewall configuration
firewall --disabled
# Install OS instead of upgrade
install
#cdrom
url --url=http://192.168.1.1/rhel67/
# Network
#network --bootproto=dhcp --device=eth0
# Root password
rootpw admin123
# System authorization information
auth  --useshadow  --passalgo=sha512
# Use text mode install
text
firstboot --disable
# System keyboard
keyboard us
# System language
lang en_US.UTF-8
# SELinux configuration
selinux --disabled
# Installation logging level
logging --level=info
# Reboot after installation
reboot
# System timezone
timezone Asia/Shanghai
# System bootloader configuration
bootloader --location=mbr --append="rhgb quiet crashkernel=auto"
# Clear the Master Boot Record
zerombr
# Partition clearing information
clearpart --all --initlabel
# Partition
#autopart
part /boot --fstype=ext4 --size=500
part pv.008002 --grow --size=1
volgroup VolGroup --pesize=4096 pv.008002
logvol / --fstype=ext4 --name=lv_root --vgname=VolGroup --size=20480
logvol /home --fstype=ext4 --name=lv_home --vgname=VolGroup --size=20480
logvol /opt --fstype=ext4 --name=lv_opt --vgname=VolGroup --size=20480
logvol /tmp --fstype=ext4 --name=lv_tmp --vgname=VolGroup --size=20480
logvol /usr --fstype=ext4 --name=lv_usr --vgname=VolGroup --size=20480
logvol /var --fstype=ext4 --name=lv_var --vgname=VolGroup --size=20480
logvol swap --name=lv_swap --vgname=VolGroup --size=65536
# Packages
%packages
@base
@chinese-support
@client-mgmt-tools
@core
@debugging
@basic-desktop
@desktop-debugging
@desktop-platform
@directory-client
@fonts
@general-desktop
@graphical-admin-tools
@input-methods
@internet-browser
@java-platform
@legacy-x
@network-file-system-client
@perl-runtime
@print-client
@remote-desktop-clients
@server-platform
@server-policy
@x11
pax
python-dmidecode
oddjob
wodim
sgpio
genisoimage
mtools
abrt-gui
certmonger
pam_krb5
krb5-workstation
libXmu
perl-DBD-SQLite
%end
file://H:\01_autoinstall\tftpboot_rhel  (1 folders, 4 files, 38.93 MB, 38.93 MB in total.)
│  initrd.img    34.72 MB
│  pxelinux.0    26.13 KB
│  vesamenu.c32  159.89 KB
│  vmlinuz   4.03 MB
└─pxelinux.cfg  (0 folders, 1 files, 991 bytes, 991 bytes in total.)
        default 991 bytes
引用他人在Linux下的安装流程
RHEL6 (64bits)系统上利用PXE+DHCP+TFTP+KickStart批量安装系统
http://chrinux.blog.51cto.com/6466723/1214641
CentOS 6.4下PXE+Kickstart无人值守安装操作系统
http://www.cnblogs.com/mchina/p/centos-pxe-kickstart-auto-install-os.html
tftpd32
请允许我直接偷懒引用官方简洁纯朴的英文说明,希望大家在遇到问题前回顾下每个选项的解释,谢谢
Tftpd32 is a free, opensource IPv6 ready application which includes DHCP, TFTP, DNS, SNTP and Syslog servers as well as a TFTP client.
TFTP
Trivial File Transfer Protocol was first defined in 1980, it is a lightweight version of the FTP protocol that has no directory browsing or password capability. Employing UDP rather than TCP for transport, TFTP is typically used to transfer firmware upgrades to network equipment such as routers, switches and IP phones.It is also used to boot diskless computers (PXE).
SNTP
Simple Network Timle Protocol is a simplified version of NTP (Network Time Protocol). They synchronise the time on workstations across a network.
DHCP
DHCP assigns IP addresses to client stations logging onto a TCP/IP network. It eliminates having to manually assign permanent IP addresses on each station.
Syslog
Syslog is a service for remotely logging data. For example, it allows to monitor videoless network equipments.
Tftpd server Settings
Base directory
The default directory used by the TFTP client and server. It may be changed from the main window.
Global Settings
Enable or disable tftpd32 servers and clients.
TFTP security
- NONE (Not recommended !)
read and write requests are allowed on all disks/directories. - Standard
read and write requests are allowed but limited to the current directory. - High
idem standard + write requests are allowed only if the input file exists and is empty. - Read only
idem standard + write requests are rejected.
TFTP Configuration
- Timeout
The maximum timeout between two retransmissions - Max Retransmit
The maximum retransmission for the same packet - Tftp Port
The port used to listen incoming requests - local ports pool
A range of ports (for example 3000:3030). These ports are used for the file transfers.
TFTP Configuration
- Option Negotiation
Enables the negotiation between client and server (RFC 2347) - PXE compatibility
Enables only the file size negotiation - Show progress Bar
Creates a gauge window for each transfer - Translate Unix file names
Translates any slash characters to a backslash - Bind Tftpd32 to this address
Enables TFTP only on one interface - Allow '' As virtual root
A file name beginning with '' points to the TFTP directory and not to the root of the disk - Use anticipation window of ??? bytes
Tftpd32 is able to send packets before receiving acknowledgements. This feature may dramatically speed up the transfer. - Hide window at startup
Tftpd32 main window remains hidden, but the icon in the tasktray is still present - Create dir.txt files
For each incoming read request, Tftpd32 lists the content of the directory and put the result in a file named "dir.txt". - Create md5 file
For each successfull read request, Tftpd32 creates a file which is the MD5 signature of the previous file
Beep for long transfer
Tftpd32 sends a beep once a transfer has ended.
DHCP Setup
- IP Pool starting Address
This is the first address which will be distributed. - Size of pool
This is the number of hosts which may be configured by Tftpd32. - Lease
This is the amount of time in minutes the address is leased for. - Boot File
Used by diskless stations. It is the file which will be retrieved by TFTP to start up the boot process.
The strings $MAC$ and $IP$ are pseudo variables which are translated into the MAC address of the client and its assignated IP address. - Default router
The IP address of the LAN gateway. - Mask
The network mask which will be assigned to the DHCP clients. - DNS servers
The IP address of the DNS. Two DNS can be configured. - WINS Server
The IP address of the WINS server. - NTP Server
The IP address of the NTP server used for synchronisation. - SIP Server
The IP address of the SIP server. It concerns mostly IP phones. - Domain Name
Either the NT domain or the internet domain. - Additional Option
The first field is the number of the option to be handled
The second filed is the value of the field. The value is prefixed with its type (a for list of IPv4 address, x for list of hex digits, b for list of decimal bytes, s for an ASCII string) [legacy prefixes: i for integer, n for network order integers] - More Additional Options ?
Tftpd32 supports up to 10 additionnal options. They have to be configured by editing the tftpd32.ini settings file. Their syntax is similar to the previous one.