引文
有时候为了实现某些效果,比如:
- 绘制某些简易图案,比如对勾,字形
- 手势相关的画线
- 制作一些复杂动效
需要对简单的UIView进行操作,这时需要我们继承CALayer &UIView,重写里面的绘制方法。两者的区别可以参见这里,二者的主要区别是:
- UIView继承于UIResponder,在 UIResponder中定义了处理各种事件和事件传递的接口, 而 CALayer直接继承 NSObject,并没有相应的处理事件的接口。UIView可以响应事件,Layer不可以.
- UIView主要是对显示内容的管理而 CALayer 主要侧重显示内容的绘制。可以理解成控制器和内部模型的关系
如何重写来控制显示
- 对UIView
绘制:- (void)drawRect:(CGRect)rect;
修改了元素,需要重绘:-(void)setNeedsDisplay; - 对CALayer
绘制:- (void)drawInContext:(CGContextRef)ctx;
修改了元素,需要重绘:-(void)setNeedsDisplay;
修改了元素,需要自动重绘:
  +  (BOOL)needsDisplayForKey:(NSString *)key {
  if ([key isEqualToString:@"progress"]) {
        return YES;
    }
    return [super needsDisplayForKey:key];
}
如何在绘制方法里绘图呢,下面是一些示例代码:
- 对CALayer
    // 更新界面
  //构划路径
    UIBezierPath* ovalPath = [UIBezierPath bezierPath];
    [ovalPath moveToPoint: pointA];
    [ovalPath addCurveToPoint:pointB controlPoint1:c1 controlPoint2:c2];
    [ovalPath addCurveToPoint:pointC controlPoint1:c3 controlPoint2:c4];
    [ovalPath addCurveToPoint:pointD controlPoint1:c5 controlPoint2:c6];
    [ovalPath addCurveToPoint:pointA controlPoint1:c7 controlPoint2:c8];
    [ovalPath closePath];
//AddPath
 CGContextAddPath(ctx, ovalPath.CGPath);
//填充
    CGContextSetFillColorWithColor(ctx, [self.indicatorColor colorWithAlphaComponent:0.3].CGColor);
    CGContextFillPath(ctx);
- UIView 由于在
- (void)drawRect:(CGRect)rect;中没有类似的context,所以需要先调用CGContextRef context = UIGraphicsGetCurrentContext();其余相同
项目中碰到的相关使用案例
1. loading转圈动效,完成后打勾:
#import <QuartzCore/QuartzCore.h>
#import <UIKit/UIKit.h>

@interface ArcToCircleLayer : CALayer
@property (nonatomic) CGFloat progress;
@property (nonatomic,strong) UIColor* fillColor;
@property (nonatomic,strong) UIColor* finishedStrokeColor;

@property (nonatomic,assign) BOOL isFinished;

@end
#import "ArcToCircleLayer.h"

static CGFloat const kLineWidth = 6;

@implementation ArcToCircleLayer

@dynamic progress;

+ (BOOL)needsDisplayForKey:(NSString *)key {
    if ([key isEqualToString:@"progress"]) {
        return YES;
    }

    return [super needsDisplayForKey:key];
}

- (void)drawInContext:(CGContextRef)ctx {
    UIBezierPath *path = [UIBezierPath bezierPath];

    CGFloat radius = MIN(CGRectGetWidth(self.bounds), CGRectGetHeight(self.bounds)) / 2 - kLineWidth / 2;
    CGPoint center = CGPointMake(CGRectGetMidX(self.bounds), CGRectGetMidY(self.bounds));

    // O
    CGFloat originStart = M_PI * 7 / 2;
    CGFloat originEnd = M_PI * 3/2;
    CGFloat currentOrigin = originStart - (originStart - originEnd) * self.progress;

    // D
    CGFloat destStart = M_PI * 3;
    CGFloat destEnd = -1*M_PI/2;
    CGFloat currentDest = destStart - (destStart - destEnd) * self.progress;

    [path addArcWithCenter:center radius:radius startAngle: currentOrigin endAngle:currentDest clockwise:NO];
    CGContextAddPath(ctx, path.CGPath);
    CGContextSetLineWidth(ctx, kLineWidth);
    if (_isFinished) {
        if (self.finishedStrokeColor) {
            CGContextSetStrokeColorWithColor(ctx, self.finishedStrokeColor.CGColor);

        }else{
            CGContextSetStrokeColorWithColor(ctx, [UIColor whiteColor].CGColor);

        }

    }else{
        CGContextSetStrokeColorWithColor(ctx, [UIColor colorWithHexString:@"13eaa4"].CGColor);

    }

    CGContextStrokePath(ctx);
    if (_isFinished) {
        [path addArcWithCenter:center radius:radius startAngle: currentOrigin endAngle:currentDest clockwise:NO];
        CGContextAddPath(ctx, path.CGPath);
        CGContextSetFillColorWithColor(ctx, self.fillColor.CGColor);

        CGContextFillPath(ctx);
    }

}
2. 仿百度贴吧下拉刷新的效果
随着下拉的进行:
- 小水滴由椭圆拉伸至圆形
- 圆形变大
- 圆形有个弹性跳跃的动画,同时圆形内部有附带动画
这里的难点是如何实现弹性跳跃的动画,这里特别感谢大神[KittenYang]的这篇文章:谈谈iOS中粘性动画以及果冻效果的实现

"小球是由弧AB、弧BC、弧CD、弧DA 四段组成,其中每段弧都绑定两个控制点:弧AB 绑定的是 C1 、 C2;弧BC 绑定的是 C3 、 C4 ....."
这里解释下控制点的计算:
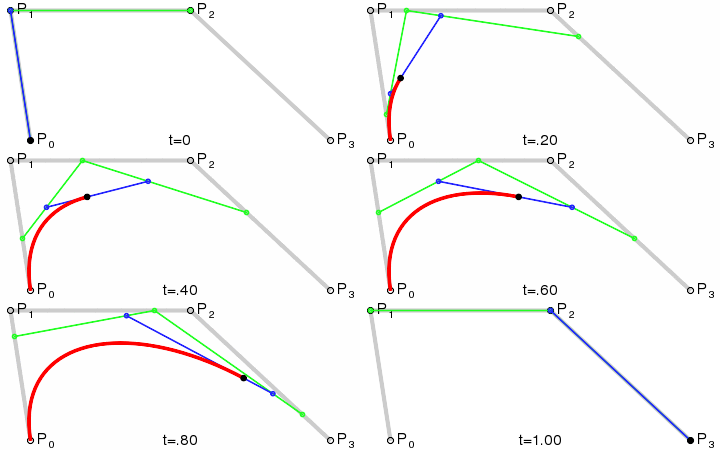
一段Bezier曲线由起点、终点、控制点构成,关于Bezier曲线的背景、曲线计算可以参考wiki,其中说到:
控制点引起曲线的变化如图:The start and end of the curve is tangent to the first and last section of the Bézier polygon, respectively.
A curve can be split at any point into two subcurves, or into arbitrarily many subcurves, each of which is also a Bézier curve.

引文中利用控制点与起点和终点的相切关系,(由于预期得到的曲线都是椭圆,在起点和终点都是相切的,所以两控制点必在垂直切线上)得到控制点的算法:
CGPoint c1 = CGPointMake(pointA.x + offset, pointA.y);
CGPoint c2 = CGPointMake(pointB.x, pointB.y - offset);

CGPoint c3 = CGPointMake(pointB.x, pointB.y + offset);
CGPoint c4 = CGPointMake(pointC.x + offset, pointC.y);

CGPoint c5 = CGPointMake(pointC.x - offset, pointC.y);
CGPoint c6 = CGPointMake(pointD.x, pointD.y + offset);

CGPoint c7 = CGPointMake(pointD.x, pointD.y - offset);
CGPoint c8 = CGPointMake(pointA.x - offset, pointA.y);
关于偏移量的计算:
当offSet设置为 直径除以3.6 的时候,弧线能完美地贴合成圆弧。我隐约感觉这个 3.6 是必然,貌似和360度有某种关系,或许通过演算能得出 3.6 这个值的必然性,但我没有尝试。
其实这个值可以这样计算:这类似于割圆术,算的最佳的可能更接近3.5。
这样绘图的工作就结束了,通过动态调整ABCD点就能实现图形的变化了
3. 手势密码
手势密码是项目中挺重要的一环,其中有几个要点
- 进入相关页面(首次进入|从后台进入)都会进行认证
- 手势密码页面的两种模式:设置,验证
- 设置需要在上方额外显示小九宫格来显示设置的图形
- 划线时途径中的圆形要有相关变色反馈、成功失败也要有
设计时相关的模型为:
PasswordInputWindow:提供给外部的窗口类,用来调起手势窗口
GesturePasswordController:窗口类的根控制器
GesturePasswordView:搭载TentacleView、NineCircleView、提示视图的父视图
TentacleView:搭载九宫格GesturePasswordButton的父视图,主要处理滑动手势来调整按钮高亮显示
NineCircleView:微缩版的TentacleView
GesturePasswordButton:绘制多种状态下的数字按键。
下面代码给出TentacleView怎么画线的
- (void)drawRect:(CGRect)rect
{
    // Drawing code
//    if (touchesArray.count<2)return;
    for (int i=0; i<touchesArray.count; i++) {
        CGContextRef context = UIGraphicsGetCurrentContext();
        if (![[touchesArray objectAtIndex:i] objectForKey:@"num"]) { //防止过快滑动产生垃圾数据
            [touchesArray removeObjectAtIndex:i];
            continue;
        }
        if (success) {
           // CGContextSetRGBStrokeColor(context, 2/255.f, 174/255.f, 240/255.f, 0.7);//线条颜色
            CGContextSetRGBStrokeColor(context, 19/255.f, 234/255.f, 164/255.f, 0.2);//线条颜色
        }
        else {
            CGContextSetRGBStrokeColor(context, 255/255.f, 93/255.f, 93/255.f, 0.2);//红色
        }
        CGContextSetLineCap(context,kCGLineCapRound);
        CGContextSetLineWidth(context,24/[UIScreen mainScreen].scale);
        CGContextMoveToPoint(context, [[[touchesArray objectAtIndex:i] objectForKey:@"x"] floatValue], [[[touchesArray objectAtIndex:i] objectForKey:@"y"] floatValue]);
        if (i<touchesArray.count-1) {
            CGContextAddLineToPoint(context, [[[touchesArray objectAtIndex:i+1] objectForKey:@"x"] floatValue],[[[touchesArray objectAtIndex:i+1] objectForKey:@"y"] floatValue]);
        }
        else{
            if (success) {
                CGContextAddLineToPoint(context, lineEndPoint.x,lineEndPoint.y);
            }
        }
        CGContextStrokePath(context);
    }
}