微信服务号开发
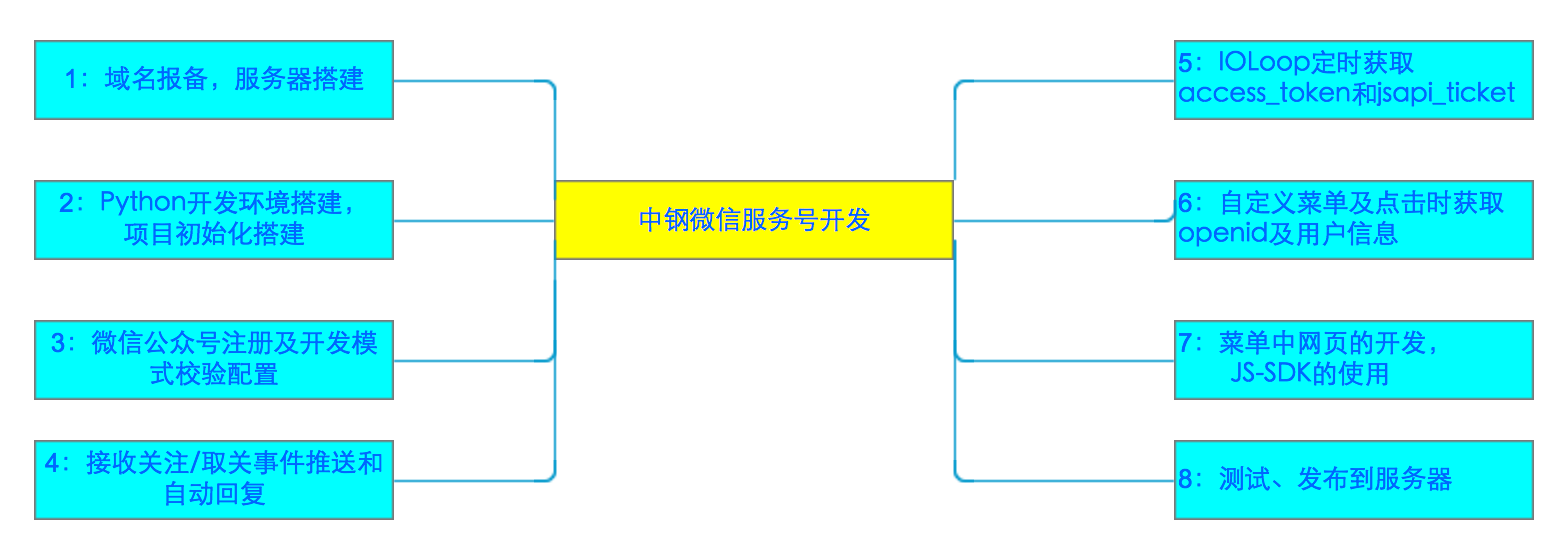
整体流程
- 域名报备,服务器搭建
- Python开发环境和项目的初始化搭建;
- 微信公众号注册及开发模式校验配置;
- 接收关注/取关事件推送和自动回复;
- IOLoop定时获取access_token和jsapi_ticket;
- 自定义菜单及点击时获取openid及用户信息;
- 菜单中网页的开发, JS-SDK的使用;
- 完成测试,发布上线,部署至服务器。
思维导图:
一.域名报备,服务器搭建
微信要求的域名是备案过的域名,且要下载微信提供的检测文件,放在搭建的服务器下,然后对域名进行测试,通过才能添加。
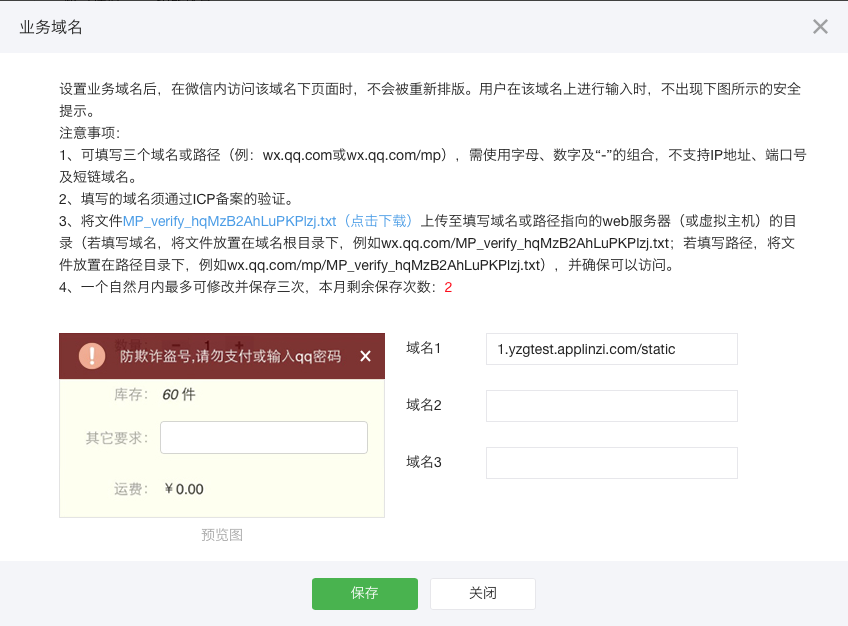
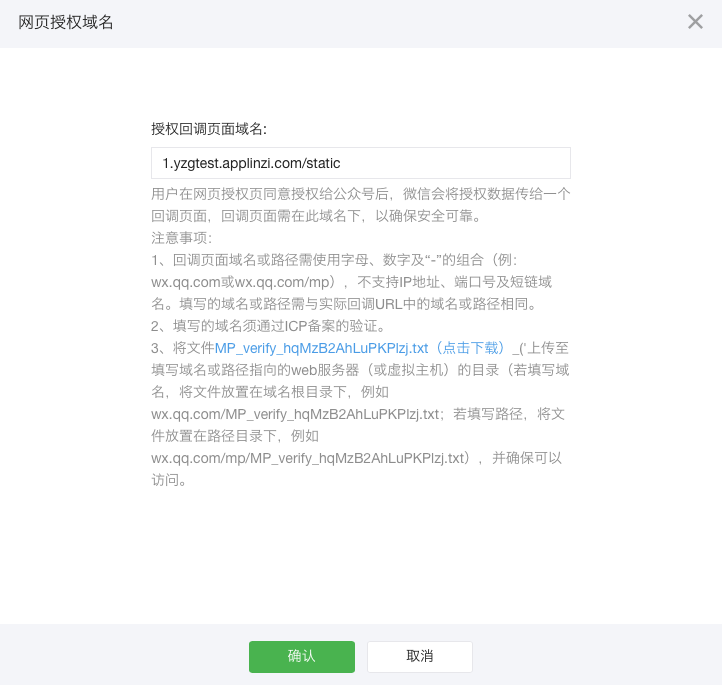
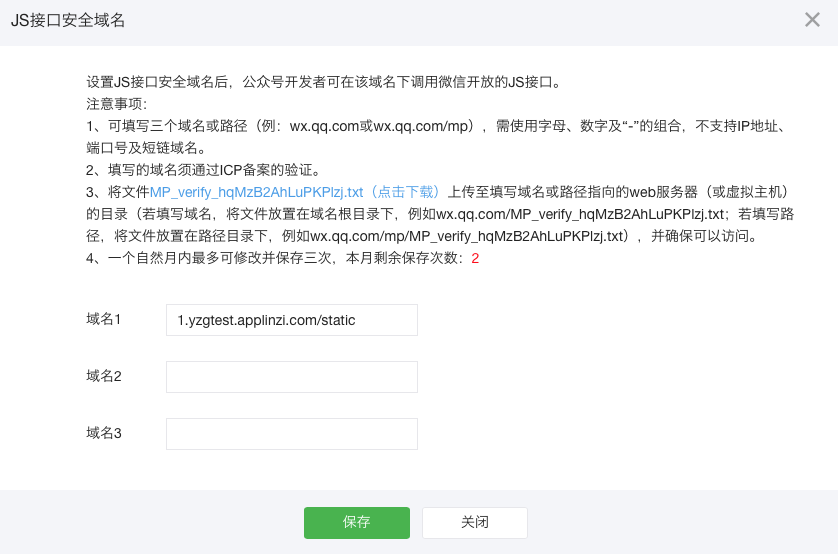
搭建项目服务器 Nginx+Tornado+Supervisor 部署操作方法
搭建Redis服务器 进行数据存储 Redis安装方法
二.Python开发环境搭建(Linux系统)及项目初始化搭建
-
安装python及pip,并配置环境变量,安装tornado框架
(1) 下载Python-3.5.2包并安装 https://www.python.org/downloads
(2) 将python配置到系统环境变量
(3) 下载pip包并安装 https://pypi.python.org/pypi/pip#downloads
(4) 将pip配置到系统环境变量
(5) 使用pip安装tornado框架pip install tornado -
创建微信服务号的后台项目,使用Tornado搭建项目入口,端口号为8000
微信服务端校验的接口文件 wxauthorize.pyimport hashlib import tornado.web from core.logger_helper import logger class WxSignatureHandler(tornado.web.RequestHandler): """ 微信服务器签名验证, 消息回复 check_signature: 校验signature是否正确 """ def data_received(self, chunk): pass def get(self): try: signature = self.get_argument('signature') timestamp = self.get_argument('timestamp') nonce = self.get_argument('nonce') echostr = self.get_argument('echostr') logger.debug('微信sign校验,signature='+signature+',×tamp='+timestamp+'&nonce='+nonce+'&echostr='+echostr) result = self.check_signature(signature, timestamp, nonce) if result: logger.debug('微信sign校验,返回echostr='+echostr) self.write(echostr) else: logger.error('微信sign校验,---校验失败') except Exception as e: logger.error('微信sign校验,---Exception' + str(e)) def check_signature(self, signature, timestamp, nonce): """校验token是否正确""" token = 'yzgtest123456' L = [timestamp, nonce, token] L.sort() s = L[0] + L[1] + L[2] sha1 = hashlib.sha1(s.encode('utf-8')).hexdigest() logger.debug('sha1=' + sha1 + '&signature=' + signature) return sha1 == signature
配置Tornado的url路由规则 url.py
    from core.server.wxauthorize import WxSignatureHandler
    import tornado.web
    '''web解析规则'''

    urlpatterns = [
        (r'/weixin', WxSignatureHandler),  # 微信签名
   ]
基本配置文件 run.py
import os
import tornado.httpserver
import tornado.ioloop
import tornado.web
from tornado.options import define, options
from core.url import urlpatterns

define('port', default=8000, help='run on the given port', type=int)

class Application(tornado.web.Application):
    def __init__(self):
        settings = dict(
            template_path=os.path.join(os.path.dirname(__file__), "core/template"),
            static_path=os.path.join(os.path.dirname(__file__), "core/static"),
            debug=True,
            login_url='/login',
            cookie_secret='MuG7xxacQdGPR7Svny1OfY6AymHPb0H/t02+I8rIHHE=',
        )
        super(Application, self).__init__(urlpatterns, **settings)


def main():
    tornado.options.parse_command_line()
    http_server = tornado.httpserver.HTTPServer(Application())
    http_server.listen(options.port)
    tornado.ioloop.IOLoop.current().start()

if __name__ == '__main__':
    main()
三. 微信公众号注册及开发模式校验配置
- 微信公众号注册
官网链接https://mp.weixin.qq.com,需要注册为服务号,依次填写信息进行注册 - 微信公众开发模式校验配置
(1)登录微信公众号后, 进入基本配置,如下:
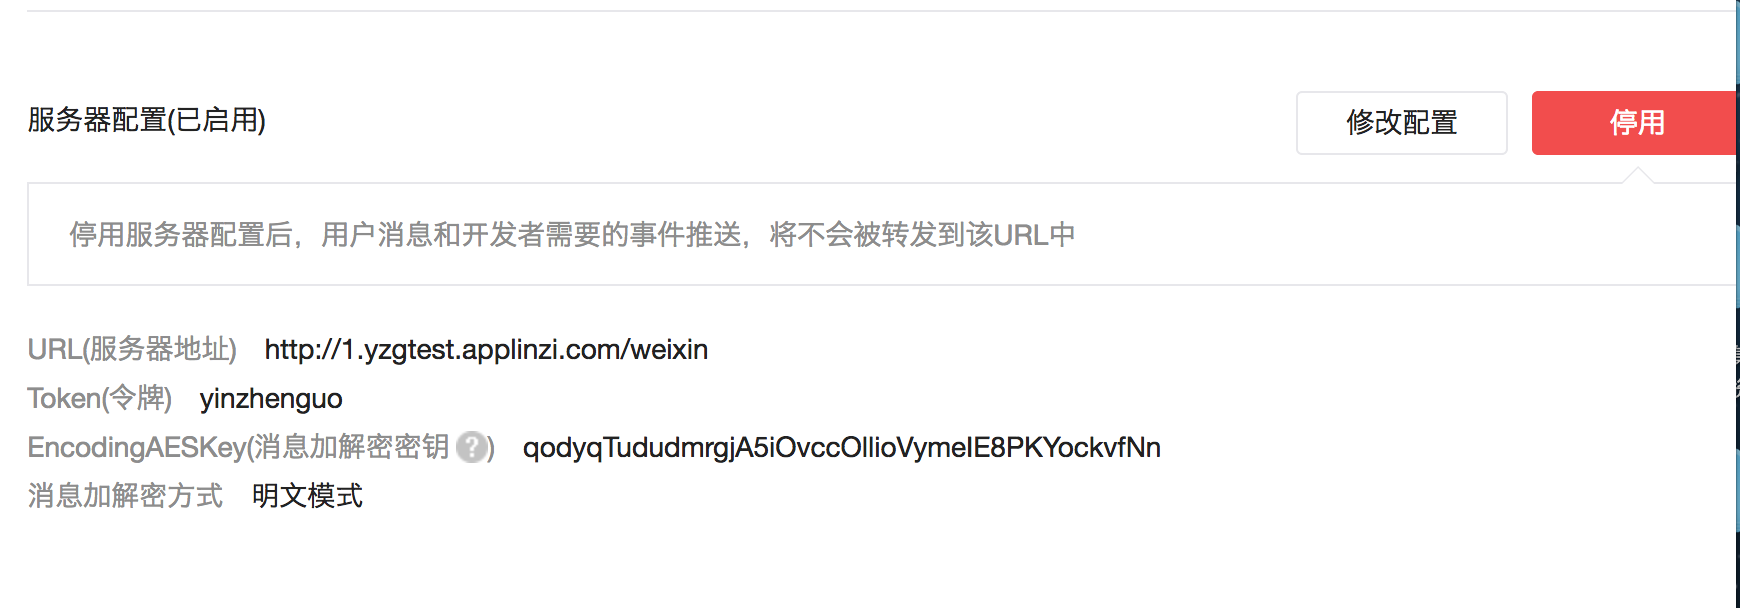
url填写为服务器域名+我们项目中微信校验的接口名
token 填写为我们项目中自定义的token: yzgtest123456
EncodingAESKey 点击"随机生成"按钮即可,消息加密方式使用明文模式
填写完毕后,先启动我们的项目,运行python run.py指令后, 保证我们的服务器是运行着的, 然后点击"提交",如果你是按照以上流程操作的话,会提示提交成功,否则校验失败,需要我们通过日志检查是哪一块出了问题.
(2) 接下来,校验成功后,点击启用,即可激活开发者模式
四. 接收关注/取关事件推送和自动回复;
- 接收关注/取关事件推送
在开发模式中,有新用户关注我们的公众号时,微信公众平台会使用http协议的Post方式推送数据至我们的后台微信校验的接口,在接收到消息后,我们后台发送一条欢迎语给该用户,关于微信公众平台推送消息的具体内容和数据格式,详见微信开发文档
以下是在wxauthorize.py文件中增加的post方法,用来接收事件推送
def post(self):
    body = self.request.body
    logger.debug('微信消息回复中心】收到用户消息' + str(body.decode('utf-8')))
    data = ET.fromstring(body)
    ToUserName = data.find('ToUserName').text
    FromUserName = data.find('FromUserName').text
    MsgType = data.find('MsgType').text
    if MsgType == 'event':
        '''接收事件推送'''
        try:
            Event = data.find('Event').text
            if Event == 'subscribe':
                # 关注事件
                CreateTime = int(time.time())
                reply_content = '欢迎关注我的公众号~'
                out = self.reply_text(FromUserName, ToUserName, CreateTime, reply_content)
                self.write(out)
        except:
            pass

def reply_text(self, FromUserName, ToUserName, CreateTime, Content):
    """回复文本消息模板"""
    textTpl = """<xml> <ToUserName><![CDATA[%s]]></ToUserName> <FromUserName><![CDATA[%s]]></FromUserName> <CreateTime>%s</CreateTime> <MsgType><![CDATA[%s]]></MsgType> <Content><![CDATA[%s]]></Content></xml>"""
    out = textTpl % (FromUserName, ToUserName, CreateTime, 'text', Content)
    return out
2.自动回复
(1) 同接收关注/取关事件推送消息一样,用户给我们公众号发送消息时,微信公众平台也会推送数据至我们的后台微信校验的接口,在接收到消息后,我们取出自定义的关键字进行匹配,匹配到了就执行自动回复
(2) 微信公众平台也提供了语音识别功能, 将用户发送的语音内容识别转化为文字,发送给我们后台,在使用该功能时需要在接口权限中打开语音识别功能.
以下是在wxauthorize.py中的post方法中增加的一个判断,用来匹配用户文本消息和语音消息中的关键字
def post(self):
    body = self.request.body
    logger.debug('微信消息回复中心】收到用户消息' + str(body.decode('utf-8')))
    data = ET.fromstring(body)
    ToUserName = data.find('ToUserName').text
    FromUserName = data.find('FromUserName').text
    MsgType = data.find('MsgType').text
    if MsgType == 'text' or MsgType == 'voice':
        '''文本消息 or 语音消息'''
        try:
            MsgId = data.find("MsgId").text
            if MsgType == 'text':
                Content = data.find('Content').text  # 文本消息内容
            elif MsgType == 'voice':
                Content = data.find('Recognition').text  # 语音识别结果,UTF8编码
            if Content == u'你好':
                reply_content = '您好,请问有什么可以帮助您的吗?'
            else:
                # 查找不到关键字,默认回复
                reply_content = "客服小钢智商不够用啦~"
            if reply_content:
                CreateTime = int(time.time())
                out = self.reply_text(FromUserName, ToUserName, CreateTime, reply_content)
                self.write(out)
        except:
            pass

    elif MsgType == 'event':
        '''接收事件推送'''
        try:
            Event = data.find('Event').text
            if Event == 'subscribe':
                # 关注事件
                CreateTime = int(time.time())
                reply_content = self.sys_order_reply
                out = self.reply_text(FromUserName, ToUserName, CreateTime, reply_content)
                self.write(out)
        except:
            pass

def reply_text(self, FromUserName, ToUserName, CreateTime, Content):
    """回复文本消息模板"""
    textTpl = """<xml> <ToUserName><![CDATA[%s]]></ToUserName> <FromUserName><![CDATA[%s]]></FromUserName> <CreateTime>%s</CreateTime> <MsgType><![CDATA[%s]]></MsgType> <Content><![CDATA[%s]]></Content></xml>"""
    out = textTpl % (FromUserName, ToUserName, CreateTime, 'text', Content)
    return out
五.IOLoop定时获取access_token和jsapi_ticket
- access_token
access_token是公众号的全局唯一票据,公众号调用各接口时都需使用。
access_token的有效期为7200秒,开发者需要进行妥善保存。access_token的存储至少要保留512个字符空间。access_token的有效期目前为2个小时,需定时刷新,重复获取将导致上次获取的access_token失效。详见微信开发文档 - jsapi_ticket
jsapi_ticket是公众号用于调用微信JS接口的临时票据。
正常情况下,jsapi_ticket的有效期为7200秒,通过access_token来获取。由于获取jsapi_ticket的api调用次数非常有限,频繁刷新jsapi_ticket会导致api调用受限,影响自身业务,开发者必须在自己的服务全局缓存jsapi_ticket 。参考文档JS-SDK使用权限签名算法 - redis数据库
用来存储access_token和jsapi_ticket等,方便快捷。Redis快速入门
配置redis程序:
basecache.py
    import redis

    """缓存服务器"""
    CACHE_SERVER = {
        'host': '127.0.0.1',
        'port': 6379,
        'database': 0,
        'password': '',
    }

    class BaseCache(object):
    """
    缓存类父类
    redis_ctl:                          redis控制句柄
    """
        _host = CACHE_SERVER.get('host', '')
        _port = CACHE_SERVER.get('port', '')
        _database = CACHE_SERVER.get('database', '')
        _password = CACHE_SERVER.get('password', '')

        @property
        def redis_ctl(self):
            """redis控制句柄"""
            redis_ctl = redis.Redis(host=self._host, port=self._port, db=self._database, password=self._password)
            return redis_ctl
tokencache.py
from core.cache.basecache import BaseCache
from core.logger_helper import logger


class TokenCache(BaseCache):
    """
    微信token缓存

    set_cache               添加redis
    get_cache               获取redis
    """
    _expire_access_token = 7200  # 微信access_token过期时间, 2小时
    _expire_js_token = 30 * 24 * 3600   # 微信js网页授权过期时间, 30天
    KEY_ACCESS_TOKEN = 'access_token'  # 微信全局唯一票据access_token
    KEY_JSAPI_TICKET = 'jsapi_ticket'  # JS_SDK权限签名的jsapi_ticket

    def set_access_cache(self, key, value):
        """添加微信access_token验证相关redis"""
        res = self.redis_ctl.set(key, value)
        self.redis_ctl.expire(key, self._expire_access_token)
        logger.debug('【微信token缓存】setCache>>>key[' + key + '],value[' + value + ']')
        return res

    def set_js_cache(self, key, value):
        """添加网页授权相关redis"""
        res = self.redis_ctl.set(key, value)
        self.redis_ctl.expire(key, self._expire_js_token)
        logger.debug('【微信token缓存】setCache>>>key[' + key + '],value[' + value + ']')
        return res

    def get_cache(self, key):
        """获取redis"""
        try:
            v = (self.redis_ctl.get(key)).decode('utf-8')
            logger.debug(v)
            logger.debug('【微信token缓存】getCache>>>key[' + key + '],value[' + v + ']')
            return v
        except Exception:
            return None
4。 使用tornado的 Ioloop 实现定时获取access_token和 jsapi_ticket,并将获取到的access_token和 jsapi_ticket保存在Redis数据库中
wxconfig.py
class WxConfig(object):
    """
    微信开发--基础配置

    """
    AppID = 'wxxxxxxxxxxxxxxxx'  # AppID(应用ID)
    AppSecret = 'xxxxxxxxxxxxxxxxxxxxxxx'  # AppSecret(应用密钥)

    '''获取access_token'''
    config_get_access_token_url = 'https://api.weixin.qq.com/cgi-bin/token?grant_type=client_credential&appid=%s&secret=%s' % (AppID, AppSecret)
wxshedule.py
from core.logger_helper import logger
import tornado.ioloop
import requests
import json
from core.server.wxconfig import WxConfig
from core.cache.tokencache import TokenCache


class WxShedule(object):
    """
    定时任务调度器

    excute                      执行定时器任务
    get_access_token            获取微信全局唯一票据access_token
    get_jsapi_ticket           获取JS_SDK权限签名的jsapi_ticket
    """
    _token_cache = TokenCache()  # 微信token缓存实例
    _expire_time_access_token = 7000 * 1000  # token过期时间

    def excute(self):
        """执行定时器任务"""
        logger.info('【获取微信全局唯一票据access_token】>>>执行定时器任务')
        tornado.ioloop.IOLoop.instance().call_later(0, self.get_access_token)
        tornado.ioloop.PeriodicCallback(self.get_access_token, self._expire_time_access_token).start()
        # tornado.ioloop.IOLoop.current().start()

    def get_jsapi_ticket(self):
        """获取JS_SDK权限签名的jsapi_ticket"""
        access_token = self._token_cache.get_cache(self._token_cache.KEY_ACCESS_TOKEN)
        if access_token:
            url = 'https://api.weixin.qq.com/cgi-bin/ticket/getticket?access_token=%s&type=jsapi' % access_token
            r = requests.get(url)
            logger.info('【微信JS-SDK】获取JS_SDK权限签名的jsapi_ticket的Response[' + str(r.status_code) + ']')
            if r.status_code == 200:
                res = r.text
                logger.info('【微信JS-SDK】获取JS_SDK权限签名的jsapi_ticket>>>>' + res)
                d = json.loads(res)
                errcode = d['errcode']
                if errcode == 0:
                    jsapi_ticket = d['ticket']
                    # 添加至redis中
                    self._token_cache.set_access_cache(self._token_cache.KEY_JSAPI_TICKET, jsapi_ticket)
                else:
                    logger.info('【微信JS-SDK】获取JS_SDK权限签名的jsapi_ticket>>>>errcode[' + errcode + ']')
                    logger.info('【微信JS-SDK】request jsapi_ticket error, will retry get_jsapi_ticket() method after 10s')
                    tornado.ioloop.IOLoop.instance().call_later(10, self.get_jsapi_ticket)
            else:
                logger.info('【微信JS-SDK】request jsapi_ticket error, will retry get_jsapi_ticket() method after 10s')
                tornado.ioloop.IOLoop.instance().call_later(10, self.get_jsapi_ticket)
        else:
            logger.error('【微信JS-SDK】获取JS_SDK权限签名的jsapi_ticket时,access_token获取失败, will retry get_access_token() method after 10s')
            tornado.ioloop.IOLoop.instance().call_later(10, self.get_access_token)

if __name__ == '__main__':

    wx_shedule = WxShedule()
    """执行定时器"""
    wx_shedule.excute()
run.py
将定时器的启动放在主程序入口处,保证每次启动服务器时,重新启动定时器
import os
import tornado.httpserver
import tornado.ioloop
import tornado.web
from tornado.options import define, options
from core.url import urlpatterns
from core.server.wxshedule import WxShedule

define('port', default=8000, help='run on the given port', type=int)


class Application(tornado.web.Application):
    def __init__(self):
        settings = dict(
            template_path=os.path.join(os.path.dirname(__file__), "core/template"),
            static_path=os.path.join(os.path.dirname(__file__), "core/static"),
            debug=True,
            login_url='/login',
            cookie_secret='MuG7xxacQdGPR7Svny1OfY6AymHPb0H/t02+I8rIHHE=',
        )
        super(Application, self).__init__(urlpatterns, **settings)


def main():
    tornado.options.parse_command_line()
    http_server = tornado.httpserver.HTTPServer(Application())
    http_server.listen(options.port)
    # 执行定时任务
    wx_shedule = WxShedule()
    wx_shedule.excute()
    tornado.ioloop.IOLoop.current().start()

if __name__ == '__main__':
六. 自定义菜单及点击菜单时获取openid
-
编写菜单对应的html页面
(1)先在template模板文件夹下制作一个index.html页面,用于点击自定义菜单时跳转到的网页.
    <!DOCTYPE html>
    <html lang="en">
    <head>
    <meta charset="UTF-8">
    <title>Title</title>
    </head>
    <body>
    这是一个测试页面
    </body>
    </html>
(2) 编写一个页面处理类,用于接收tornado.web.RequestHandler请求
    import tornado.web

    class PageHandler(tornado.web.RequestHandler):
    """
    微信handler处理类
    """
    def post(self, flag):
        if flag == 'index':
        '''首页'''
        self.render('index.html')
(3) 给PageHandler添加url规则,在url.py中添加
    from core.server.wxauthorize import WxSignatureHandler
    from core.server.page_handler import PageHandler
    from core.server.wx_handler import WxHandler


    '''web解析规则'''

    urlpatterns = [
        (r'/weixin', WxSignatureHandler),  # 微信签名
        (r'/page/(.*)', PageHandler),  # 加载页面
        (r'/wx/(.*)', WxHandler),  # 网页授权
    ]
-
创建一个菜单,并给菜单添加获取授权code的url
以下是微信公众平台官方文档给出的具体流程:详见网页授权获取用户基本信息
关于网页授权回调域名的说明:
1、在微信公众号请求用户网页授权之前,开发者需要先到公众平台官网中的开发者中心页配置授权回调域名。请注意,这里填写的是域名(是一个字符串),而不是URL,因此请勿加 http:// 等协议头;
2、授权回调域名配置规范为全域名,比如需要网页授权的域名为:www.qq.com,配置以后此域名下面的页面http://www.qq.com/music.html 、 http://www.qq.com/login.html 都可以进行OAuth2.0鉴权。但http://pay.qq.com 、 http://music.qq.com 、 http://qq.com无法进行OAuth2.0鉴权
关于网页授权的两种scope的区别说明:
1、以snsapi_base为scope发起的网页授权,是用来获取进入页面的用户的openid的,并且是静默授权并自动跳转到回调页的。用户感知的就是直接进入了回调页(往往是业务页面)
2、以snsapi_userinfo为scope发起的网页授权,是用来获取用户的基本信息的。但这种授权需要用户手动同意,并且由于用户同意过,所以无须关注,就可在授权后获取该用户的基本信息。
3、用户管理类接口中的“获取用户基本信息接口”,是在用户和公众号产生消息交互或关注后事件推送后,才能根据用户OpenID来获取用户基本信息。这个接口,包括其他微信接口,都是需要该用户(即openid)关注了公众号后,才能调用成功的。
关于网页授权access_token和普通access_token的区别
1、微信网页授权是通过OAuth2.0机制实现的,在用户授权给公众号后,公众号可以获取到一个网页授权特有的接口调用凭证(网页授权access_token),通过网页授权access_token可以进行授权后接口调用,如获取用户基本信息;
2、其他微信接口,需要通过基础支持中的“获取access_token”接口来获取到的普通access_token调用。
具体而言,网页授权流程分为四步:
1、引导用户进入授权页面同意授权,获取code
2、通过code换取网页授权access_token(与基础支持中的access_token不同)
3、如果需要,开发者可以刷新网页授权access_token,避免过期
4、通过网页授权access_token和openid获取用户基本信息(支持UnionID机制)
我们希望在用户点击自定义菜单时,需要先获取用户的openid,以便从我们自己的后台中通过该openid获取这个用户更多的信息,比如它对应的我们后台中的uid等。
因此我们需要给这个自定义菜单按钮添加一个对应的URL,点击这个菜单,跳转到这个URL,这个URL会触发获取code操作,获取到code后,通过获取授权的access_token接口,获取openid及access_token
(1) 给菜单添加url,及state映射关系
state为自定义字符串,可以用来标识是用户点击了哪一个菜单,放在一个dict字典中,当前我们制作的第一个菜单就对应 /page/index 映射,在wxconfig.py中添加
class WxConfig(object):
    """
    微信开发--基础配置

    """
    AppID = 'wxxxxxxxxxxxxxxxx'  # AppID(应用ID)
    AppSecret = 'xxxxxxxxxxxxxxxxxxxx'  # AppSecret(应用密钥)

    """微信网页开发域名"""
    AppHost = 'http://xxxxxx.com'

    '''微信公众号菜单映射数据'''
    """重定向后会带上state参数,开发者可以填写a-zA-Z0-9的参数值,最多128字节"""
    wx_menu_state_map = {
        'menuIndex0': '%s/page/index' % AppHost,  # 测试菜单1
}
在wxauthorize.py中添加授权认证的类:
class WxAuthorServer(object):
    """
    微信网页授权server

    get_code_url                            获取code的url
    get_auth_access_token                   通过code换取网页授权access_token
    refresh_token                           刷新access_token
    get_userinfo                            拉取用户信息
    """

    """授权后重定向的回调链接地址,请使用urlencode对链接进行处理"""
    REDIRECT_URI = '%s/wx/wxauthor' % WxConfig.AppHost

    """
    应用授权作用域
    snsapi_base (不弹出授权页面,直接跳转,只能获取用户openid)
    snsapi_userinfo (弹出授权页面,可通过openid拿到昵称、性别、所在地。并且,即使在未关注的情况下,只要用户授权,也能获取其信息)
    """
    SCOPE = 'snsapi_base'
    # SCOPE = 'snsapi_userinfo'

    """通过code换取网页授权access_token"""
    get_access_token_url = 'https://api.weixin.qq.com/sns/oauth2/access_token?'

    """拉取用户信息"""
    get_userinfo_url = 'https://api.weixin.qq.com/sns/userinfo?'


    def get_code_url(self, state):
        """获取code的url"""
        dict = {'redirect_uri': self.REDIRECT_URI}
        redirect_uri = urllib.parse.urlencode(dict)
        author_get_code_url = 'https://open.weixin.qq.com/connect/oauth2/authorize?appid=%s&%s&response_type=code&scope=%s&state=%s#wechat_redirect' % (WxConfig.AppID, redirect_uri, self.SCOPE, state)
        logger.debug('【微信网页授权】获取网页授权的code的url>>>>' + author_get_code_url)
        return author_get_code_url

    def get_auth_access_token(self, code):
        """通过code换取网页授权access_token"""
        url = self.get_access_token_url + 'appid=%s&secret=%s&code=%s&grant_type=authorization_code' % (WxConfig.AppID, WxConfig.AppSecret, code)
        r = requests.get(url)
        logger.debug('【微信网页授权】通过code换取网页授权access_token的Response[' + str(r.status_code) + ']')
        if r.status_code == 200:
            res = r.text
            logger.debug('【微信网页授权】通过code换取网页授权access_token>>>>' + res)
            json_res = json.loads(res)
            if 'access_token' in json_res.keys():
                return json_res
            elif 'errcode' in json_res.keys():
                errcode = json_res['errcode']

    def get_userinfo(self, access_token, openid):
        """拉取用户信息"""
        url = self.get_userinfo_url + 'access_token=%s&openid=%s&lang=zh_CN' % (access_token, openid)
        r = requests.get(url)
        logger.debug('【微信网页授权】拉取用户信息Response[' + str(r.status_code) + ']')
        if r.status_code == 200:
            res = r.text
            json_data = json.loads((res.encode('iso-8859-1')).decode('utf-8'))
            logger.debug('【微信网页授权】拉取用户信息>>>>' + str(json_data))
创建菜单的类文件:wxmenu.py
import requests
import json
from core.server.wxconfig import WxConfig
from core.cache.tokencache import TokenCache
from core.logger_helper import logger
from core.server.wxauthorize import WxAuthorServer


class WxMenuServer(object):
    """
    微信自定义菜单

    create_menu                     自定义菜单创建接口
    get_menu                        自定义菜单查询接口
    delete_menu                     自定义菜单删除接口
    create_menu_data                创建菜单数据
    """

    _token_cache = TokenCache()  # 微信token缓存
    _wx_author_server = WxAuthorServer()  # 微信网页授权server

    def create_menu(self):
        """自定义菜单创建接口"""
        access_token = self._token_cache.get_cache(self._token_cache.KEY_ACCESS_TOKEN)
        if access_token:
            url = WxConfig.menu_create_url + access_token
            data = self.create_menu_data()
            r = requests.post(url, data.encode('utf-8'))
            logger.debug('【微信自定义菜单】自定义菜单创建接口Response[' + str(r.status_code) + ']')
            if r.status_code == 200:
                res = r.text
                logger.debug('【微信自定义菜单】自定义菜单创建接口' + res)
                json_res = json.loads(res)
                if 'errcode' in json_res.keys():
                    errcode = json_res['errcode']
                    return errcode
        else:
            logger.error('【微信自定义菜单】自定义菜单创建接口获取不到access_token')

    def get_menu(self):
        """自定义菜单查询接口"""
        access_token = self._token_cache.get_cache(self._token_cache.KEY_ACCESS_TOKEN)
        if access_token:
            url = WxConfig.menu_get_url + access_token
            r = requests.get(url)
            logger.debug('【微信自定义菜单】自定义菜单查询接口Response[' + str(r.status_code) + ']')
            if r.status_code == 200:
                res = r.text
                logger.debug('【微信自定义菜单】自定义菜单查询接口' + res)
                json_res = json.loads(res)
                if 'errcode' in json_res.keys():
                    errcode = json_res['errcode']
                    return errcode
        else:
            logger.error('【微信自定义菜单】自定义菜单查询接口获取不到access_token')

    def delete_menu(self):
        """自定义菜单删除接口"""
        access_token = self._token_cache.get_cache(self._token_cache.KEY_ACCESS_TOKEN)
        if access_token:
            url = WxConfig.menu_delete_url + access_token
            r = requests.get(url)
            logger.debug('【微信自定义菜单】自定义菜单删除接口Response[' + str(r.status_code) + ']')
            if r.status_code == 200:
                res = r.text
                logger.debug('【微信自定义菜单】自定义菜单删除接口' + res)
                json_res = json.loads(res)
                if 'errcode' in json_res.keys():
                    errcode = json_res['errcode']
                    return errcode
        else:
            logger.error('【微信自定义菜单】自定义菜单删除接口获取不到access_token')

    def create_menu_data(self):
        """创建菜单数据"""
        menu_data = {'button': []}  # 大菜单
        menu_Index0 = {
            'type': 'view',
            'name': '测试菜单1',
            'url': self._wx_author_server.get_code_url('menuIndex0')
        }
        menu_data['button'].append(menu_Index0)
        MENU_DATA = json.dumps(menu_data, ensure_ascii=False)
        logger.debug('【微信自定义菜单】创建菜单数据MENU_DATA[' + str(MENU_DATA) + ']')
        return MENU_DATA

if __name__ == '__main__':
    wx_menu_server = WxMenuServer()
    '''创建菜单数据'''
    # wx_menu_server.create_menu_data()
    # '''自定义菜单创建接口'''
    wx_menu_server.create_menu()
    '''自定义菜单查询接口'''
    # wx_menu_server.get_menu()
    '''自定义菜单删除接口'''
    # wx_menu_server.delete_menu()
(2) 点击菜单时,触发获取code接口。微信公众平台携带code和state请求访问我们后台的 /wx/wxauthor 接口,根据state字段获取 /page/index 映射,用来做重定向用。
通过code换取网页授权access_token及openid,拿到openid后我们就可以重定向跳转到 /page/index映射对应的页面 index.html
import tornado.web
from core.logger_helper import logger
from core.server.wxauthorize import WxConfig
from core.server.wxauthorize import WxAuthorServer
from core.cache.tokencache import TokenCache


class WxHandler(tornado.web.RequestHandler):
    """
    微信handler处理类
    """

    '''微信配置文件'''
    wx_config = WxConfig()
    '''微信网页授权server'''
    wx_author_server = WxAuthorServer()
    '''redis服务'''
    wx_token_cache = TokenCache()

    def post(self, flag):

        if flag == 'wxauthor':
            '''微信网页授权'''
            code = self.get_argument('code')
            state = self.get_argument('state')
            # 获取重定向的url
            redirect_url = self.wx_config.wx_menu_state_map[state]
            logger.debug('【微信网页授权】将要重定向的地址为:redirct_url[' + redirect_url + ']')
            logger.debug('【微信网页授权】用户同意授权,获取code>>>>code[' + code + ']state[' + state + ']')
            if code:
                # 通过code换取网页授权access_token
                data = self.wx_author_server.get_auth_access_token(code)
                openid = data['openid']
                logger.debug('【微信网页授权】openid>>>>openid[' + openid + ']')
                if openid:
                    # 跳到自己的业务界面
                    self.redirect(redirect_url)
                else:
                    # 获取不到openid
                    logger.debug('获取不到openid')
七.菜单中网页的开发, JS-SDK的使用
在完成自定义菜单后,我们就可以开发自己的网页了,在网页中涉及到获取用户地理位置,微信支付等,都需要使用微信公众平台提供的JS-SDK,详见 微信JS-SDK说明文档
微信JS-SDK概述
微信JS-SDK是微信公众平台面向 网页开发者 提供的基于微信内的网页开发工具包。
通过使用微信JS-SDK,网页开发者可借助微信高效地使用拍照、选图、语音、位置等手机系统的能力,同时可以直接使用微信分享、扫一扫、卡券、支付 等微信特有的能力,为微信用户提供更优质的网页体验。
JSSDK使用步骤
步骤一:绑定域名
先登录微信公众平台进入“公众号设置”的“功能设置”里填写“JS接口安全域名”。
备注:登录后可在“开发者中心”查看对应的接口权限。
步骤二:引入JS文件
在需要调用JS接口的页面引入如下JS文件,(支持https):http://res.wx.qq.com/open/js/jweixin-1.0.0.js 如需使用摇一摇周边功能,请引入 http://res.wx.qq.com/open/js/jweixin-1.1.0.js
备注:支持使用 AMD/CMD 标准模块加载方法加载
步骤三:通过config接口注入权限验证配置
注意:所有需要使用JS-SDK的页面必须先注入配置信息,否则将无法调用(同一个url仅需调用一次,对于变化url的SPA的web app可在每次url变化时进行调用,目前Android微信客户端不支持pushState的H5新特性,所以使用pushState来实现web app的页面会导致签名失败,此问题会在Android6.2中修复)。
wx.config({
    debug: true, // 开启调试模式,调用的所有api的返回值会在客户端alert出来,若要查看传入的参数,可以在pc端打开,参数信息会通过log打出,仅在pc端时才会打印。
    appId: '', // 必填,公众号的唯一标识
    timestamp: , // 必填,生成签名的时间戳
    nonceStr: '', // 必填,生成签名的随机串
    signature: '',// 必填,签名,见附录1
    jsApiList: [] // 必填,需要使用的JS接口列表,所有JS接口列表见附录2
});
步骤四:通过ready接口处理成功验证
wx.ready(function(){
// config信息验证后会执行ready方法,所有接口调用都必须在config接口获得结果之后。
    config是一个客户端的异步操作,所以如果需要在页面加载时就调用相关接口,则须把相关接口放在ready函数中调用来确保正确执行。
    对于用户触发时才调用的接口,则可以直接调用,不需要放在ready函数中。
});
步骤五:通过error接口处理失败验证
wx.error(function(res){
    // config信息验证失败会执行error函数,如签名过期导致验证失败,
    具体错误信息可以打开config的debug模式查看,也可以在返回的res参数中查看,对于SPA可以在这里更新签名。
});
网页分享朋友圈实例:
wx.onMenuShareTimeline({
    title: '', // 分享标题
    link: '', // 分享链接
    imgUrl: '', // 分享图标
    success: function () {
    // 用户确认分享后执行的回调函数
    },
    cancel: function () {
    // 用户取消分享后执行的回调函数
    }
});
签名算法:
签名生成规则如下:参与签名的字段包括noncestr(随机字符串), 有效的jsapi_ticket, timestamp(时间戳), url(当前网页的URL,不包含#及其后面部分)。
对所有待签名参数按照字段名的ASCII 码从小到大排序(字典序)后,使用URL键值对的格式(即key1=value1&key2=value2…)拼接成字符串string1。
这里需要注意的是所有参数名均为小写字符。对string1作sha1加密,字段名和字段值都采用原始值,不进行URL 转义。
实现:获取JS-SDK权限签名 wxsign.py
import time
import random
import string
import hashlib
from core.server.wxconfig import WxConfig
from core.cache.tokencache import TokenCache
from core.logger_helper import logger


class WxSign:
    """\
    微信开发--获取JS-SDK权限签名

    __create_nonce_str              随机字符串
    __create_timestamp              时间戳
    sign                            生成JS-SDK使用权限签名
    """

    def __init__(self, jsapi_ticket, url):
        self.ret = {
            'nonceStr': self.__create_nonce_str(),
            'jsapi_ticket': jsapi_ticket,
            'timestamp': self.__create_timestamp(),
            'url': url
        }

    def __create_nonce_str(self):
        return ''.join(random.choice(string.ascii_letters + string.digits) for _ in range(15))

    def __create_timestamp(self):
        return int(time.time())

    def sign(self):
        string = '&'.join(['%s=%s' % (key.lower(), self.ret[key]) for key in sorted(self.ret)])
        self.ret['signature'] = hashlib.sha1(string.encode('utf-8')).hexdigest()
        logger.debug('【微信JS-SDK】获取JS-SDK权限签名>>>>dict[' + str(self.ret) + ']')
        return self.ret

if __name__ == '__main__':
    token_cache = TokenCache()
    jsapi_ticket = token_cache.get_cache(token_cache.KEY_JSAPI_TICKET)
    # 注意 URL 一定要动态获取,不能 hardcode
    url = '%s/page/index' % WxConfig.AppHost
    sign = WxSign(jsapi_ticket, url)
    print(sign.sign())
八.完成测试,项目发布
将项目代码传到服务器,通过Superviso服务器启动run.py,然后用手机微信扫描关注中国银通的服务号,进行测试。