现在前面:
欢迎大家关注我的个人博客:<a href="http://blog.noasis.cn" >博客地址</a>,这里主要是我在个人开发时候遇到的坑和挖完的坑,包括 PHP CentOS 以及 Swift 等相关只是
知识背景:
- 在日程开放中页面传值是最为常见的,(具体动画特效见我的<a href="https://github.com/liu1013269528/Collection">我的GitHub</a> )

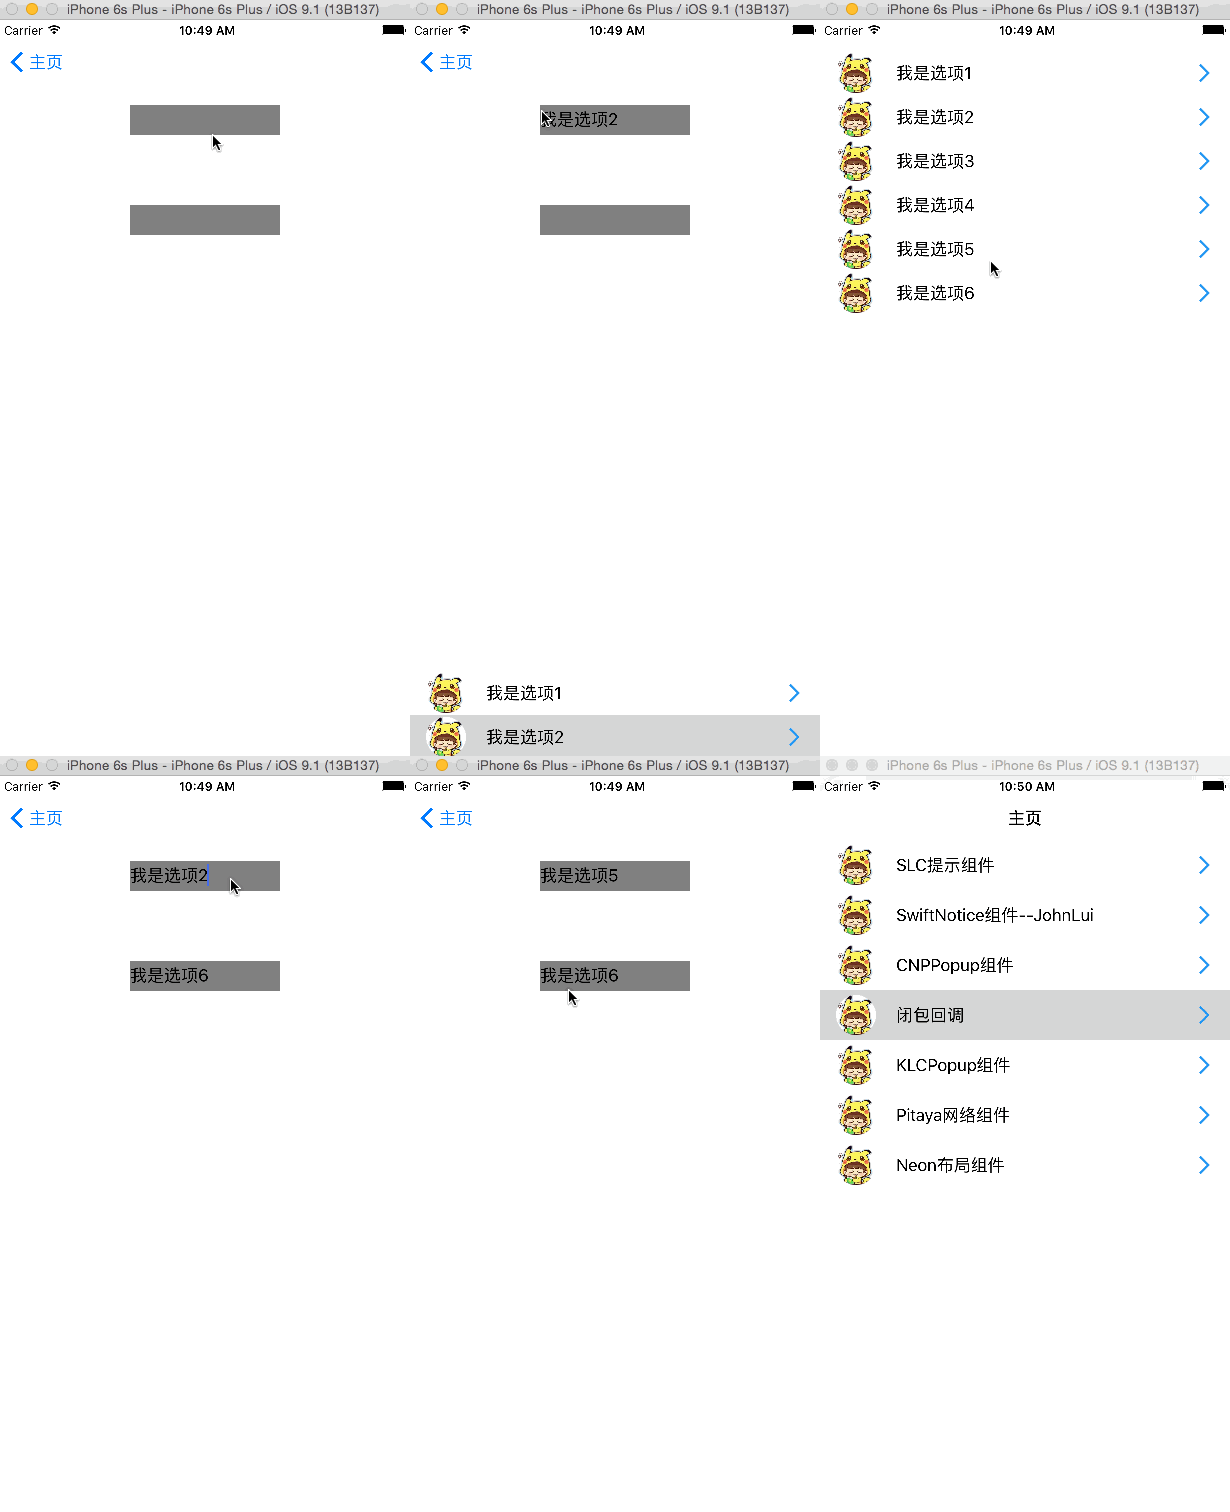
效果图
学习目标:
- 学习闭包的使用
- 学习页面传值FirstViewController --> SecondViewController
- 通过闭包回调将值传回:SecondViewController --> FirstViewController
步骤
1. 创建两个UIViewController:
LWRootViewController.swift 和 LWSecondViewController.swift
因为是Demo,我的布局就比较随意.一般两种方式(纯代码创建和storyboard)本次使用纯代码创建
2. LWRootViewController的具体代码
1. 创建组件,初始化,代码如下:
<pre>```swift
var textFieldWithTagOne: UITextField?
var textFieldWithTagTwo: UITextField?

override func viewDidLoad() {
    super.viewDidLoad()
    self.view.backgroundColor = UIColor.whiteColor()


    //通过tag获取控件
    textFieldWithTagOne = UITextField(frame: CGRectMake(0, 0, 150,30))
    textFieldWithTagOne!.center = CGPoint(x: self.view.center.x, y: 100)
    textFieldWithTagOne!.backgroundColor = UIColor.grayColor()
    textFieldWithTagOne!.tag = 1
    textFieldWithTagOne!.addTarget(self, action: "getValue:", forControlEvents: UIControlEvents.EditingDidBegin)
    self.view.addSubview(textFieldWithTagOne!)

    textFieldWithTagTwo = UITextField(frame: CGRectMake(0, 0, 150,30))
    textFieldWithTagTwo!.center = CGPoint(x: self.view.center.x, y: 200)
    textFieldWithTagTwo!.backgroundColor = UIColor.grayColor()
    textFieldWithTagTwo!.tag = 2
    textFieldWithTagTwo!.addTarget(self, action: "getValue:", forControlEvents: UIControlEvents.EditingDidBegin)
    self.view.addSubview(textFieldWithTagTwo!)

}
   - 这里涉及了代码创建界面时的为何放在ViewDidLoad()中,其实这就要扯到     UIViewController的生命周期了。(我会在文章末尾出简单讲一下^__^)

#### 2. 创建两个事件:

<pre> ```swift
//给两个textField添加的点击事件,通过tag
 func getValue(sender: UITextField) {
        let tag = sender.tag
        let second = LWSecondViewController()
        second.initWithClosure(tag, dataList: ["我是选项1", "我是选项2", "我是选项3", "我是选项4", "我是选项5", "我是选项6"], closuer: getValueClosure)
        //页面跳转,从下往上
        self.presentViewController(second, animated: true, completion: nil)
    }
    //闭包,在SecondViewController中回调传值的事件
    func getValueClosure(tag: Int,string: String) {
        let tf = self.view.viewWithTag(tag) as! UITextField
        tf.text = string
    }
```</pre>

### 3. LWSecondViewController.swift的具体代码:

在上一节,我已经详细讲解了如何代码创建UITableView以及如何调用自定义UITableViewCell和自定义UITableCell的制作,这里我就不再一一赘述。

  #### 1. 变量声明跟初始化

<pre>```swift

private let cellId = "DemoListID"

    //声明一个闭包
    private var myClosure: sendValueClosure?
    private var myTag: Int?
    private var dataList = [String]()
    //下面的方法需要传入上个界面的someFunctionThatAClosure函数指针
    func initWithClosure(tag: Int,dataList: [String],closuer: sendValueClosure?) {
        //讲函数指针赋值给myClosure闭包,该闭包中覆盖了someFunctionThatTakesAClosure函数中的局部变量等引用
        self.myTag = tag
        self.dataList = dataList
        self.myClosure = closuer
    }

    override init(nibName nibNameOrNil: String?, bundle nibBundleOrNil: NSBundle?) {
        super.init(nibName: nibNameOrNil, bundle: nibBundleOrNil)
    }

    required init?(coder aDecoder: NSCoder) {
        fatalError("init(coder:) has not been implemented")
    }


    override func viewDidLoad() {
        super.viewDidLoad()
        self.view.backgroundColor = UIColor.whiteColor()
        let tableList = UITableView(frame: CGRectMake(0, 30, self.view.frame.width, self.view.frame.height))
        let nib = UINib(nibName: "DemoListCell", bundle: nil) //Cell文件名
        tableList.registerNib(nib, forCellReuseIdentifier: cellId)
        tableList.delegate = self
        tableList.dataSource = self
        tableList.reloadData()
        self.view.addSubview(tableList)
    }
```</pre>


#### 2. 有UITableView直接要写UITableViewDelegate和UITableViewDataSource的代理
 - 今天告诉大家另外一种方式,使用扩展在LWSecondViewController的类的外面添加
 - 在UITableView的点击事件中调用闭包,将当前的Cell的值传递给回LWRootViewController


<pre>```swift

extension LWSecondViewController: UITableViewDataSource {
    func numberOfSectionsInTableView(tableView: UITableView) -> Int {
        return 1
    }

    func tableView(tableView: UITableView, numberOfRowsInSection section: Int) -> Int {
        return self.dataList.count
    }

    func tableView(tableView: UITableView, cellForRowAtIndexPath indexPath: NSIndexPath) -> UITableViewCell {
        let cell = tableView.dequeueReusableCellWithIdentifier(self.cellId, forIndexPath: indexPath) as! DemoListCell
        //cell.cellImg.image = UIImage(named: powerData[indexPath.row][2])
        cell.cellLabel.text = self.dataList[indexPath.row]
        return cell
    }

}

extension LWSecondViewController: UITableViewDelegate {
    func tableView(tableView: UITableView, didSelectRowAtIndexPath indexPath: NSIndexPath)
    {
        let index = indexPath.row
        let string = self.dataList[index]
        if let closure = self.myClosure {
            closure(tag: self.myTag!,string: string)
        }
        self.dismissViewControllerAnimated(true, completion: nil)
    }
}
```</pre>

ok!就是这么简单,回复让我知道 (*^__^*)


# TIPS

## 添加事件小贴士
1. 代码添加事件
 <pre>```swift
    item.addTarget(self, action: "click:", forControlEvents: UIControlEvents.TouchUpInside)
```</pre>
2. action: "funcName:" 和 action: Selector("funcName")的区别
 - 第一种可以讲当前的item当做对象传递给事件:funcName(sender: AnyObject)
 - 第二种不可以:funcName()


## 这里跟大家讲一下生命周期:

1. viewDidLoad 页面已经载入完毕,可以显示了
2. viewWillAppear 页面界面将要显示
3. viewDidAppear 页面界面已经展示出来
4. viewWillDisappear 界面即将消失(可以做一下小动画在界面消失前)
5. viewDidDisAppear 界面消失不见,但还是在内存中
6. viewDidUnload 界面已经从内存中释放出来